
Waking up in the morning and the first thing that happens in the bedroom, the shutters go up and the light is turned on dim. Arriving in the bathroom, the bathroom mirror shows all important messages, upcoming appointments, health status and even the news. At the same time, you hear the coffee machine being switched on in the kitchen, so you can have a fresh cup of coffee right away. This or something similar is how home automation used to be imagined. Today we are not far away from it, which is why I would like to introduce you to the openHAB project. I show how openHAB is set up and configured, what the difference is to other systems and at the end of the blog series the Az-Touch Mod is integrated.
Required hardware and software
For this part of the blog series, all you need is a Raspberry Pi 3 or better a Raspberry Pi 4. Optionally, you can also install openHAB on a Linux, Windows or MAC operating system, or via Docker. A selection, which I will not go into completely, can be found at the download page of openHAB.
Home automation software
If you search the internet for smart home or home automation, you will be flooded with an abundance of programs, providers or complete solutions. As an ignorant person, you quickly ask yourself: what is the right system for me? I have also asked myself this question and am still wavering between two solutions. In principle, one must distinguish between two types of home automation programs:
- Commercial
- Open Source
In the first variant, the manufacturer or large corporation usually wants to implement home automation in the four walls with its own hardware. The problem here is usually that many third-party hardware is not supported, or the appropriate modules must first be purchased at extra cost. The question of what exactly the program does in the background is not apparent to programmers, since the source code is usually not freely accessible.
This is different with the open source variant, since here one or more developers are actively working on the program and/or the add-ons, which are completely visible on GitHub or other hosts. Who is interested in what has been programmed, or even wants to actively co-develop, usually has the first point of contact there. Also, problems are solved faster through external forums, or errors in the code are sometimes fixed faster than with the commercial solution. This article is clearly about the open source variant, where I would like to mention four programs:
- FHEM
- ioBroker
- openHAB
- Home Assistant
The order does not reflect a ranking of which is better or worse. Rather, the question is what you personally want for a system and must then weigh the positive and negative sides. There is actually also a Bachelor Thesis which was written by Primin Gersbacher in the winter semester 2017/2018. However, FHEM is not mentioned in this thesis, instead Node-Red is presented.
FHEM
I would like to start with FHEM, since it is the oldest solution compared to the others mentioned. FHEM is the abbreviation for Freund Hausautomation and EEnergy-Mmeasurement and was written in the Perl programming language. The interface is rather rudimentary and not as stylish as the other applications. It takes a while to get started, but once you have a running system and also understand how to add new devices or protocols, it is quite efficient. The community around FHEM is still large, but over time, due to other projects, it is not as active as it was during its heyday.
I didn't work much with this software solution, as I realized pretty quickly that FHEM didn't meet my needs. FHEM is available for all major operating systems.
ioBroker
Quite young in the team is ioBroker, which was released in 2014. The programming language is JavaScript or Node.js. The user interface is kept very modern to futuristic, which I personally find appealing. The setup and integration of the individual components is quickly done with little training. Compared to openHAB, for example, ioBroker is still quite young, but the community around ioBroker is growing steadily and development is also progressing faster. Only the configuration down to the smallest detail was not possible, at least in my tests. However, it must also be said that not everyone wants to do everything down to the smallest detail. ioBroker is available for Windows, the Raspberry Pi (Linux), and as a Docker image.
openHAB
openHAB, which is also the subject of the rest of this blog series, was launched in 2010 and is (as of January 2023) available in major version 3. Similar to ioBroker, openHAB follows a modern approach, but more training is needed here, as it goes into more detail. Especially beginners, or people who want a "quick success", will probably be a bit frustrated here. However, those who got behind the principle of openHAB will enjoy the advantages. openHAB is available for all common operating systems, the Raspberry Pi and as a Docker image.
Home Assistant
Unfortunately, I can say the least about Home Assistant, as I have not been able to get this solution to work on my devices. The Home Assistant website promises a lot and the screenshots shown also piqued my interest. In this, I had the feeling that Home Assistant combined the style of ioBroker and openHAB, but this is a guess at the point. I actually found it interesting that Home Assistant is written entirely in Python, which is still a fairly young programming language. Nevertheless, the development started back in 2013 and since then the project has been steadily improved. Home Assistant is available for all common operating systems, the Raspberry Pi and other systems similar to the Raspberry Pi.
So why openHAB?
The question that now arises is why I now use openHAB in this blog series and also at home as a solution. For one thing, in my short tests I liked openHAB better visually, the installation on my home server test system went with a few steps, it does not require a lot of resources and the initial "disadvantage" of the level of detail I liked very much in the end. In the end, the wording of some basic terms was also more plausible for me than with ioBroker, for example, and I felt I got to my goal faster with openHAB. However, this is a purely subjective opinion on my part and with just 12h per home automation solution, it is by no means a truly decisive opinion. Other than in the above mentioned Bachlor ThesisI have probably only seen a fraction and learned the systems. So if you want to find the right system for you, you should try something yourself.
The installation
Basically, there are three different variants of how to install openHAB:
- Using a ready-made image for the Raspberry Pi
- Installation for the respective operating system
- Using a Docker image to launch a container from it
I also tried the latter variant, but it takes time to get the latest updates with the Docker image. So if you have the possibility of virtualization on an old laptop / PC / mini PC / I would recommend variant 2. Can or must it be variant 1, because you have e.g. just a Raspberry Pi 4 still lying around, you should boot it best from USB and not from the SD card.
At this point I would like to show the installation with variant 1 and 2, whereby I use Debian as operating system for variant 2, a detailed explanation for Windows or Mac is provided by openHAB directly on their website. download page.
Installation on the Raspberry Pi
To install openHAB on the Raspberry Pi, it first needs an image. On the corresponding GitHub page select the appropriate image. This is available as a 32bit or 64bit version, which you have to consider when choosing, see image 1.

Image 1: Choosing the right Raspios version
The flashing from the USB stick, for this the booting via USB must be activated, or SD card is then done via Etcher or the Raspberry Pi Imager, whereby the previously downloaded image must be selected, see Figure 2.

Image 2: Etcher settings before flashing
Depending on the size of the data medium, flashing may take some time, see Figure 3.

Image 3: Flashing RaspiOS
After that, the data medium can theoretically be plugged into the Raspberry Pi. If you want to use WLAN as a means of communication, unlike in my case, then you have to configure the WiFi in the openhabian.conf in the boot directory of the disk. Here is also a detailed documentation for individual configuration steps like the WiFi. After that, the data carrier can be installed in the Raspberry Pi at the latest. In the following, first the file system on the disk is expanded, necessary SSH keys are created and then openHABian is installed. openHABian is a kind of service tool, similar to raspi-config in the console. This includes the installation of Java and the basic configuration of openHAB. Especially the configuration of openHABian and all needed programs takes a while depending on the Raspberry Pi. When everything has worked, the Raspberry Pi is rebooted one last time. Before that there will be a message in the output that the configuration was successful at the next startup. After this startup, initial openHAB is prepared, which you can then freely configure later. According to the instructions, the whole process takes between 15 to 45 minutes, depending on the Raspberry Pi. Finally, after the installation, the web interface should be accessible via http://openhabian:8080 or http://IP-VOM-PI:8080 should be accessible. After that you can work with openHAB or start with the basic setup for your home automation.
Installation under a Debian based OS
Since I prefer to work with Linux instead of Windows, I enjoy the advantage that even older hardware runs noticeably faster than comparable Windows systems. This is partly due to the fact that I use Debian or Debian based OS for many of my systems. One of the best-known representatives of this category is Ubuntu, although I now use either Debian exclusively, or somewhat more specialized Linux distributions.
Another advantage of Debian based OSes in this case is that you can conveniently install openHABian on them. This is because Raspberry OS is also based on Debian. Just when you select Linux in the Download tab, you already get the hint for Debian that you can optionally install openHABian, see Figure 4.

Image 4: Hint to install openHABian for Debian
The installation is quite simple if you follow the instructions of openHAB exactly, see code 1.
# start shell as root user
sudo bash
# install git - you can skip this if it's already installed
apt-get update
apt-get install git
# download, link and create config file
git clone -b openHAB3 https://github.com/openhab/openhabian.git /opt/openhabian
ln -s /opt/openhabian/openhabian-setup.sh /usr/local/bin/openhabian-config
cp /opt/openhabian/build-image/openhabian.conf /etc/openhabian.conf
Code 1: prepare and install openHABian
In the instruction shown above, the basic configuration is also copied to the correct place for the later installation of openHAB. The file "/etc/openhabian.conf" is worth a look, because some passwords, modules to be installed and system names are entered here. So if something should be adjusted before the installation, see code 2, it has to be done here.
openhabian-config unattended
Code 2: install openHABian and openHAB
The command from Code 2 will update the operating system, install needed packages and set up openHAB. As with the installation on the Raspberry Pi, the installation may take some time. There should be a corresponding success message at the end and the web interface should be available via http://openhabian:8080 or http://IP-VOM-PI:8080 should be accessible.
openHAB setup and short overview
Once the installation of openHAB is complete, the configuration page is accessible via port 8080, as written before. It is best to look in the FritzBox or in the interface of your operating system, which IP address your openHAB device has now. At this point I can Fing for iOS and Android, which scans the network once and shows an overview of all active devices.
Once you have found the IP and entered the port, you will be prompted directly to create an administration account, see Image 5.
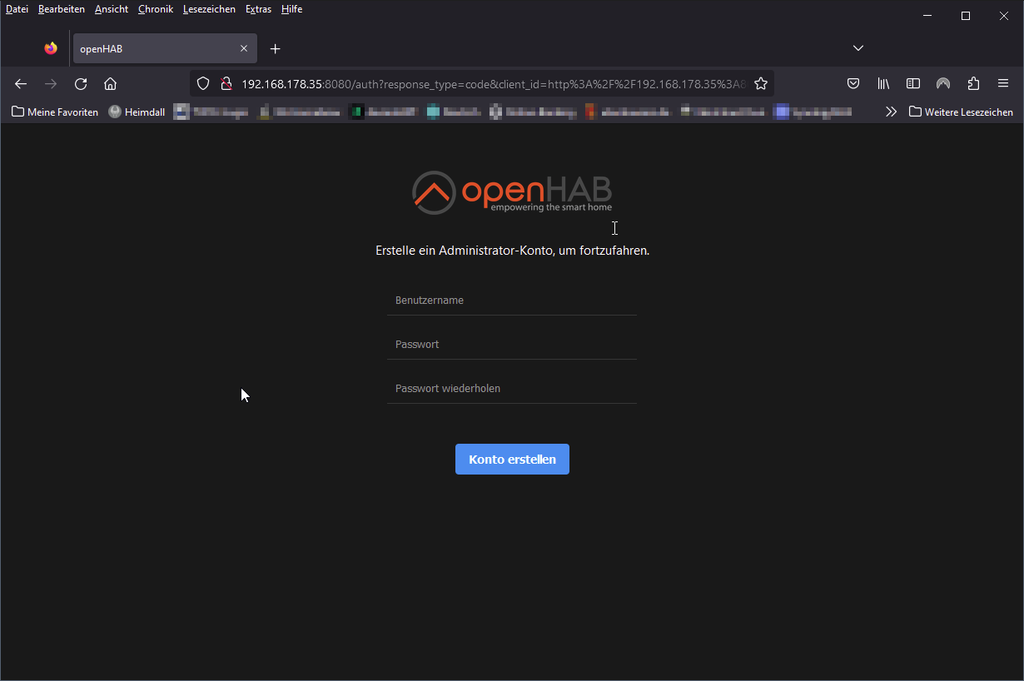
Image 5: Create admin account for openHAB
At this point it appears that the configuration file does not use the stored settings, which I personally find a bit of a shame. Nevertheless, enter a user and a secure password here, there is no check if the password is secure!
The next step is then the setup, which is optional, but I recommend at this point. This sets some basic parameters, which will be needed afterwards by the so called bindings, the modules you reload, see

Image 6: Start the setup
First, you specify the language, region and time zone. With this you determine the language of the interface and also the time. The next step is related to your location, see Image 7.

Image 7: Specify your location
This is needed in some bindings, for example to determine the sunrise or sunset, or for the weather data. Don't worry, the data will not be stored on a server somewhere later, but the location will be sent to the corresponding service each time to get the data. Should the determination about your device doesn't work, e.g. because a pi-hole blocks it, or you don't know your exact latitude and longitude, you can still use the map (Map) to determine the location, see Image 8.

Image 8: Determine the position on a map
Now comes the moment that is a bit misleading at the beginning. In the next step, openHAB wants to know from you which add-ons you want to install, see Figure 9. In the later course, however, we will never again talk about add-ons, but about bindings. These are, as mentioned above, the installed modules that you need for your devices. This also includes interfaces such as MQTT, which you may not immediately suspect at the beginning.

Image 9: Add bindings
Don't worry if you don't select any at first, the selection, see Image 10, can always be made later.
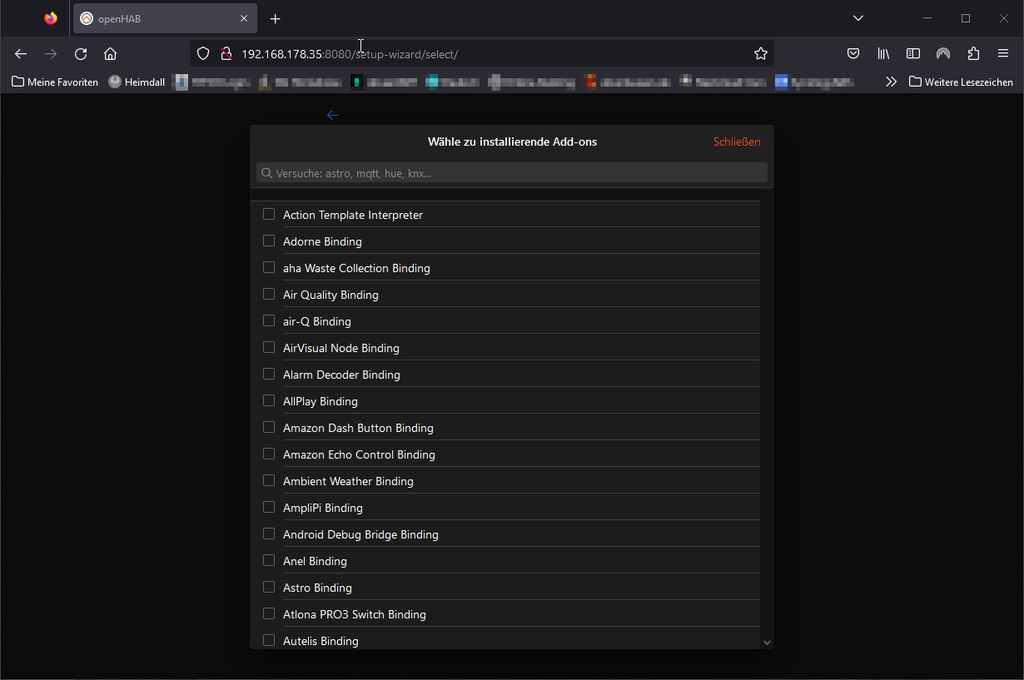
Image 10: Selecting the right bindings
At this point, however, I have found the following bindings to be useful, since I also use them in my household:
- Astro - gives exact information about sunrise and sunset for the location.
- DWD Unwetter - weather warnings of the German Weather Service based on the location
- MQTT - for communication with my MQTT broker
- OpenWeatherMap - for weather data based on my stored position
- Shelly - for querying and controlling my Shelly products
Once you have found the right bindings for you, everything will be listed again, see Figure 11, before you can finally install everything.
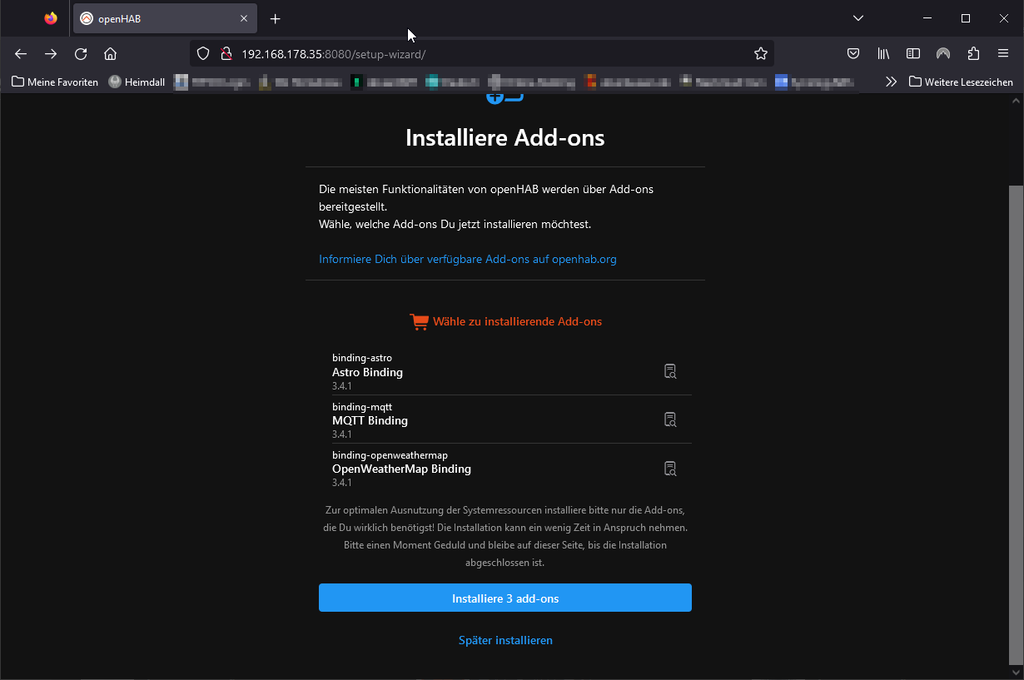
Image 11: The selected bindings are summarized once again
The installation may take some time, depending on your selection and internet connection. Afterwards, you should see a welcome message, see Figure 12.

Image 12: Welcome message from openHAB
With confirmation by means of Start, you will get to the standard view of openHAB. Since nothing is currently configured, the pages must now be filled with life.
Short overview
If you load openHAB, and logged in as administrator, then you have a clear structure on the interface, see Image 13. All configuration is done in the editor area, Red 1. This view changes when a menu is opened in the ribbon, Red 2, and a sub-item is selected. In the bottom menu, Red 3, which depends on its configuration in openHAB, the overview, locations in the model, active devices, and properties such as temperature, humidity, pressure, and other environmental values are displayed.

Image 13: Layout of the web page
Much of these views will be explained in more detail in the other articles in this series. Especially the modeling and the integration of the sensors/devices is very complex. The better you think this through and prepare it, the easier the configuration will be later. One problem with openHAB is that subsequent modeling is complicated to implement.
In the next article we will create an exemplary house and add sensors. The environmental data will be transferred from a D1 Mini, or a NodeMCU Developer Kit with a BME280 via MQTT.


11 commenti
G.S
Hallo, interessantes Projekt nur schade das Arduino will nicht mitmachen
Lg. Georg
Andreas Wolter
@Arnim: der zweite Teil ist bei uns bereits eingetroffen. Er wird gegengelesen und in das System eingefügt. Geplant ist die Veröffentlichung für den 20.03.2023
Grüße,
Andreas Wolter
AZ-Delivery Blog
Arnim
Super Einleitung in das Thema und für mich endlich mal der Push hier an mein altes System (RaspMatic + nodeRED) zu gehen. Einrichtung hat super geklappt und die Oberfläche von openHAB gefällt mir sehr gut. Mein großer (12 Jahre) hat inzwischen auch schon fast alle knapp 150 homematic Komponenten, knapp zehn Sonose und diverses anderes (HUE, …) – komplett eigenständig – eingerichtet und spielt bereits recht erfolgreich mit den HABpanels rum. Jetzt geht es wohl an die Regeln … 😃 Danke für den Artikel!
ABER: Wann kommt die Fortsetzung??? 😍
Viele Grüße aus dem wilden Süden!
Jörn Weise
Hallo Herr Behm,
soweit ich das sehe sollte NodeRed auf dem Port 1880 lauschen, wenn Sie aber über den Port 8080 ebenfalls NodeRed angezeigt bekommen, dann ist anscheinend irgendwo ein Fehler in der Konfiguration. Ich kann an der Stelle nun nicht sagen, welcher Web-Server bei NodeRed läuft. Ich kann mir an der Stelle gut vorstellen, mit der Installation von NodeRed ein Web-Server installiert und mit default-Einstellungen geladen wird.
openHab nutzt keinen Web-Server im klassischen Sinne, was ich gerade auf die schnelle mal ergoogled habe, sondern der Dienst von openHab lauscht einfach auf dem Port.
Ich kann mir an der Stelle nur folgende mögliche Szenarien vorstellen:
- NodeRed installiert einen Web-Server und nutzt neben den Port 80 und 443 auch noch den Port 8080 und blockiert damit openHAB
- Ggf. befindet sich noch im Cache ihres Browsers eine alte Seite, die zu dem Fehler führt
- Ein anderer Dienst oder Service routet NodeRed auf Port 8080, weswegen openHAB nicht angezeigt wird
Aktuell habe ich leider nicht die Zeit mir das genauer anzusehen, da ich mit der Blogreihe voll beschäftigt bin. In der Regel sollte es aber helfen, wenn Sie in der configurations-File von openHAB einen anderen Port angeben und den Rasperry Pi einmal neu starten.
Gruß
Jörn Weise
Jörn Weise
Hallo bernd,
parallel habe ich nichts betrieben, da ich immer eine sauberes System zum testen haben wollte.
Ich denke aber, sofern man weiß wo man dies einstellen kann, sollte ein parallelbetrieb von verschiedenen Lösungen funktionieren.
openHab bietet in der configurations-File (/etc/default/openhab) kann der Port verändert werden, danach muss aber am besten der Pi bzw. das System neu gestartet werden.
Gruß
Jörn
bernd
Welche Erfahrungen gibt es mit dem “Parallelbetrieb” um neben zB einem existierenden FHEM System ein Probe-System für zB OpenHAB zu installieren (und zu betreiben)?
Andreas Wolter
@Dieter Behm: wie bereits erwähnt, habe ich vom Autoren die Info bekommen, dass es Probleme gibt, wenn man OpenHAB und Node Red parallel betreiben möchte. Ich schlage vor, dass Sie wie in der Beschreibung eine frische Installation verwenden und nur OpenHAB installieren. Wenn Node Red parallel läuft, ist das nicht 1:1 die gleiche Installation wie in dem Beitrag beschrieben. Um eine Lösung zu finden, würde ich zuerst alles 1:1 durchführen.
Grüße,
Andreas Wolter
AZ-Delivery Blog
Dieter Behm
Hallo Herr Wolter,
die Installation habe ich genau wie beschrieben auf dem Raspberry durchgeführt. Auf dem Raspi läuft auch NodeRed und der Broker. Ich habe auch schon versucht den Port zu ändern, hat nicht geklappt.
Gruß
Dieter Behm
Andreas Wolter
@Dieter Behm: um Ihnen helfen zu können, sind weitere Informationen notwendig. Auf welchem System haben Sie openHAB installiert und haben Sie parallel Node Red installiert? Ich habe dazu den Autoren kontaktiert, der mir mitteilte, dass openHAB und Node Red parallel etwas schwer zum Laufen zu bekommen sind, da sich die Ports in die Quere kommen. Das wäre seine erste Diagnose. Ansonsten wie gesagt sind weitere Informationen notwendig. Wenn Sie die Installation so durchführen, wie hier im Blogbeitrag beschrieben, sollte es so funktionieren.
Grüße,
Andreas Wolter
AZ-Delivery Blog
Dieter Behm
Hallo,
die Installation hat geklappt, nur wenn ich die Ip und die Adresse 8080 eingebe kommt bei mit Node Red.
Können Sie mir bitte helfen, das zu ändern .
Gruß
Dieter Behm
(Anfänger)
Jean-Claude Feltes
Hi,
Encouraged by an article in the french journal “Hackable” I just started with HomeAssistant and got it to work relatively fast, as I had a good tutorial. There is however still a lot (yes, a lot!) to learn for me.
What I like is the ESPHome integration that allows us to program ESPs or even now Raspi Picos to use them to co send sensor values to HA.
If you are interested, have a look at my experience report:
http://staff.ltam.lu/feljc/electronics/homeassistant/HomeAssistant_1.pdf
http://staff.ltam.lu/feljc/electronics/homeassistant/ESPHome_commandline.pdf