Nella terza Parte della Serie "Pflanzenwächter" arriviamo a un, nelle Parti precedenti già distribuito schaltungstechnisches Dettaglio indietro e ampliare il Numero dei nostri Pflanzenwächter collegabili Feuchtesensoren a un massimo di sei. L'uno o l'altro sono forse già sei partitore di Tensione notato, mentre fino ad oggi, tuttavia, solo uno di essi era collegato. Il restante 5 partitore di Tensione servivano finora in Merito a tale scopo, a 5 da 6 Analogico-Digitale Ingressi del ESP32 definito a 0 attingere da un lato, da un eventualmente incontrollato di Vibrare impedire, ma anche per il nostro ESP accertabile fare, su quale dei 6 Ingressi ora un Sensore di umidità è collegato e quale non. Perché, SENZA la Modifica del Codice con il semplice Collegamento di un altro Sensore (fino a un massimo di 6) e un successivo Reset del Sistema, sarà possibile, per ulteriori Sensori a Volontà e Necessità di collegarsi. Possiamo quindi un qualsiasi Numero da un minimo di 1 a un massimo di 6 Sensori, a partire dal sinistro della Porta (GPIO36) seguendo fino a un massimo di destro Porta GPIO 33) dotare. Si può, tuttavia, non Porta tra i Sensori vengono omessi, in quanto in caso contrario non vengono rilevati. Di seguito è riportato l'Maximalbestückung con Feuchtesensoren dimostrato:

i Nostri Pezzi si estende pertanto:1 x LED di Colore Verde (560nm); 5 mm
- 1x LED di Colore Giallo (605nm); 5 mm
- 1x LED di Colore Rosso (633nm); 5 mm
- 6x130kΩ Resistenza Tolleranza ±1%
- 6x 47 kω Resistenza Tolleranza ±1
- 3x 150Ω Resistenza Tolleranza ±1%
-
6x Sensore igrometrico Capacitivo
- 1x ESP32-38Pin Variante Generic; Tipo NodeMCU-32S; Gamba 38;
- 1x YwRobot Breadboard Alimentazione
ora che abbiamo le necessarie modifiche Hardware hanno eseguito, abbiamo ancora bisogno del nostro Codice ESP un po ' di personalizzare sia la nostra APP mobile per espandere. In primo luogo, vi invitiamo di Codice riportato di seguito sul nostro ESP alto:
#include <driver/adc.h>
#include <WiFi.h>
#include <WiFiClient.h>
#include <BlynkSimpleEsp32.h>


// Portedefinierung Led's
#define LED_Rot     18    // LED Rosso
#define LED_Gelb    14    // LED Giallo
#define LED_Gruen   15    // Verde LED

/ LED PWM Impostazioni
#define PWMfreq 5000  // 5 Khz di frequenza di base per Display a LED
#define PWMledChannelA  0
#define PWMledChannelB  1
#define PWMledChannelC  2
#define PWMresolution  8 // 8 Bit di Risoluzione per LED PWM

//Altre Definizioni
#define ADCAttenuation ADC_ATTEN_DB_11    //ADC_ATTEN_DB_11 = 0-3,6 V Attenuazione (ADC ADC Estensione
#define MoisureSens_Poll_Interval 300000   // Intervallo di tempo tra due Bodenfeuchtemessungen in Millisecondi -> ogni 5 Minuti Pacchetto al Cellulare
#define MaxSensors 6                      // Numero Massimo di collegabili FeuchteSensoren
#define StartInit true
#define Sens_Calib true
#define Sens_NOTCalib false

// Blynk APP Definizioni
#define BLYNK_GREEN     "#23C48E"
#define BLYNK_BLUE      "#04C0F8"
#define BLYNK_YELLOW    "#ED9D00"
#define BLYNK_RED       "#D3435C"
#define BLYNK_BLACK     "#000000"
#define BLYNK_PRINT Serial
#define BLYNK_NO_BUILTIN
#define BLYNK_NO_FLOAT
//#define BLYNK_DEBUG

struct MoistureSensorCalibrationData
{   int Data[MaxSensors * 2] = {0, 0, 0, 0, 0, 0, 0, 0, 0, 0, 0, 0,}; // Calibration Data per il sensore di umidità. Si prega di Progetto Testo e rispettare i Valori provviste di regolare   String SensorName[MaxSensors] = {"Pianta 1", "Pianta 2", "Pianta 3", "Pianta 4", "Pianta 5", "Pianta 6"}; // Sensorname, anche in APP come Intestazione viene visualizzato   byte StatusBorderPercentValues[MaxSensors * 2][2] = { {10, 50},     // Zweidimensinonales Array per Prozentgrenzwerte (Semaforo) Singolarmente per Sensore di umidità (1 -6)     {10, 50},     {10, 50},     {10, 50},     {10, 50},     {10, 50}   };
};

struct MoistureSensorData
{   int Percent[MaxSensors] = {0, 0, 0, 0, 0, 0};  // Feuchtigkeitssensordaten in Percentuale   byte Old_Percent[MaxSensors] = {0, 0, 0, 0, 0, 0}; / Precedente/ _ Feuchtigkeitssensordaten in Percentuale (Scopo: la Quantità di dati consumo di energia.)   bool DataValid [MaxSensors] = {false, false, false, false, false, false};
};


//Global Variables

char auth[] = "xxxxxxxxxxxxxxxxxxxxxxxxxxxxxxxx"; // Hier lt. Anleitung Token di Autenticazione dere Blynk App eintragen (E-Mail).
// Deine WiFi Zugangsdaten.
char ssid[] = "Deine_WLAN_SSID";                 // Bitte un eigene WLAN SSID anpassen
char pass[] = "Dein _WLAN _Passwort!";           // Bitte un eigene WLAN Passwort anpassen

MoistureSensorCalibrationData MCalib;
MoistureSensorData MMeasure;
byte AttachedMoistureSensors; // Rilevato Active Sensori di Umidità (Conte)
unsigned long Moisure_ServiceCall_Handler = 0;  // Ritardo Variabile per il Ritardo tra Moisure Letture

void setup() {   pinMode(LED_Rot, OUTPUT);   pinMode(LED_Gelb, OUTPUT);   pinMode(LED_Gruen, USCITA);   Seriale.begin(115200);   // inizializza la comunicazione seriale a 115200 bit per secondo:   ledcSetup(PWMledChannelA, PWMfreq, PWMresolution);   ledcSetup(PWMledChannelB, PWMfreq, PWMresolution);   ledcSetup(PWMledChannelC, PWMfreq, PWMresolution);   ledcAttachPin(LED_Rot, PWMledChannelA);   // collegare il canale per il GPIO per essere controllato   ledcAttachPin(LED_Gelb, PWMledChannelB);   ledcAttachPin(LED_Gruen, PWMledChannelC);   SetLedConfig(255, 255, 255);   di Serie.println(F("Systemkonfiguration:"));   AttachedMoistureSensors = DetectMoistureSensors();   Seriale.di stampa(AttachedMoistureSensors);   di Serie.println(F(" Bodenfeuchtigkeitsensor(en)"));   Seriale.stampa(F("Verbindung zu WLAN"));   ritardo(500);   Blynk.iniziare(auth, ssid, pass);  // Inizializzare Connessione WiFi oltre Blync Biblioteca   di Serie.println(F(" erfolgreich."));   SetLedConfig(0, 0, 0);   Init_Blynk_APP();   Run_MoistureSensors(StartInit);   per (int i = AttachedMoistureSensors; io < 6; ho++) {     Update_Blynk_APP(ho, Sens_Calib);   };
}

byte DetectMoistureSensors ()
{
#define MinSensorValue 100   byte Rilevato = 0;   per (int io = 0; ho < MaxSensors; ho++)   {     int MSensorRawValue = ReadMoistureSensor_Raw_Val(io);     se ( MSensorRawValue > MinSensorValue) {       Rilevato un++;     } altro {       break;     }   }   se (Rilevato < 1)   {     Seriale.println(F("Keine Bodenfeuchtigkeitssesoren erkannt. Sistema angehalten."));     esp_deep_sleep_start();     mentre (1) {}   }   il ritorno Rilevato;
}

bool SetLedConfig(byte Rosso, byte giallo, byte verde)
{   ledcWrite(PWMledChannelA, Rosso); // Rote LED   ledcWrite(PWMledChannelB, giallo); // Gelbe LED   ledcWrite(PWMledChannelC, verde); // Sgomberare LED   ritorno vero;
}

int ReadMoistureSensor_Raw_Val(byte Sensore)
{   int ReturnValue, ho;   a lungo somma = 0;
#define NUM_READS 6   adc1_config_width(ADC_WIDTH_BIT_12);   //Gamma 0-4095   interruttore (Sensore)   {     caso 0:       {         adc1_config_channel_atten(ADC1_CHANNEL_0, ADCAttenuation);         per (io = 0; ho < NUM_READS; i++) { // algoritmo di calcolo della Media           somma += adc1_get_raw( ADC1_CHANNEL_0 ); //Lettura analogica         }         ReturnValue = somma / NUM_READS;         pausa;       }     caso 1:       {         adc1_config_channel_atten(ADC1_CHANNEL_3, ADCAttenuation);         per (io = 0; ho < NUM_READS; i++) { // algoritmo di calcolo della Media           somma += adc1_get_raw( ADC1_CHANNEL_3 ); //Lettura analogica         }         ReturnValue = somma / NUM_READS;         pausa;       }     caso 2:       {         adc1_config_channel_atten(ADC1_CHANNEL_6, ADCAttenuation);         per (io = 0; ho < NUM_READS; i++) { // algoritmo di calcolo della Media           somma += adc1_get_raw( ADC1_CHANNEL_6 ); //Lettura analogica         }         ReturnValue = somma / NUM_READS;         pausa;       }     caso 3:       {         adc1_config_channel_atten(ADC1_CHANNEL_7, ADCAttenuation);         per (io = 0; ho < NUM_READS; i++) { // algoritmo di calcolo della Media           somma += adc1_get_raw( ADC1_CHANNEL_7 ); //Lettura analogica         }         ReturnValue = somma / NUM_READS;         pausa;       }     caso 4:       {         adc1_config_channel_atten(ADC1_CHANNEL_4, ADCAttenuation);         per (io = 0; ho < NUM_READS; i++) { // algoritmo di calcolo della Media           somma += adc1_get_raw( ADC1_CHANNEL_4 ); //Lettura analogica         }         ReturnValue = somma / NUM_READS;         pausa;       }     di default:       {         adc1_config_channel_atten(ADC1_CHANNEL_5, ADCAttenuation);         per (io = 0; ho < NUM_READS; i++) { // algoritmo di calcolo della Media           somma += adc1_get_raw( ADC1_CHANNEL_5 ); //Lettura analogica         }         ReturnValue = somma / NUM_READS;         pausa;       }   }   ritorno ReturnValue;
}

void Init_Blynk_APP()
{   Blynk.setProperty(V1, "etichetta", MCalib.SensorName[0]);   Blynk.setProperty(V2, "etichetta", MCalib.SensorName[1]);   Blynk.setProperty(V3, "etichetta", MCalib.SensorName[2]);   Blynk.setProperty(V4, "etichetta", MCalib.SensorName[3]);   Blynk.setProperty(V5, "etichetta", MCalib.SensorName[4]);   Blynk.setProperty(V6, "etichetta", MCalib.SensorName[5]);
}

void Update_Local_Display()
{   byte red1 = 0;   byte yellow1 = 0;   byte verde1 = 0;   per (byte io = 0; ho < AttachedMoistureSensors; io++)   {     se (MMeasure.DataValid[io])     {       se ( MMeasure.per Cento[i] > MCalib.StatusBorderPercentValues[ho][1])       {         verde1++;       } altro se ( MMeasure.per Cento[i] > MCalib.StatusBorderPercentValues[ho][0])       {         yellow1++;       } altro       {         red1++;       }     }   }   se (red1 > 0)   {     SetLedConfig(255, 0, 0);   }   altro se (yellow1 > 0)   {     SetLedConfig(0, 255, 0);   }   altro se (verde1 > 0)   {     SetLedConfig(0, 0, 100);   }   altro   {     SetLedConfig(100, 100, 100);   }
}

void Update_Blynk_APP(byte Sensore, bool Calibrato)
{   interruttore (Sensore)   {     caso 0:       {         se ((MMeasure.DataValid[0]) & (Calibrato))         {           se ( MMeasure.per Cento[0] > MCalib.StatusBorderPercentValues[0][1])           {             Blynk.setProperty(V1, "colore", BLYNK_GREEN);           } altro se ( MMeasure.per Cento[0] > MCalib.StatusBorderPercentValues[0][0])           {             Blynk.setProperty(V1, "colore", BLYNK_YELLOW);           } altro           {             Blynk.setProperty(V1, "colore", BLYNK_RED);           }           ritardo(100);           Blynk.virtualWrite(V1, MMeasure.per Cento[0]);         } altro         {           se (Calibrato)           {             Blynk.setProperty(V1, "etichetta", "Deaktiviert");             ritardo(100);             Blynk.virtualWrite(V1, 0);             ritardo(100);             Blynk.setProperty(V1, "colore", BLYNK_BLACK);           }           altro           {             Blynk.virtualWrite(V1, 0);             ritardo(100);             Blynk.setProperty(V1, "colore", BLYNK_BLUE);           }         }         pausa;       }     caso 1:       {         se ((MMeasure.DataValid[1]) & (Calibrato))         {           se ( MMeasure.per Cento[1] > MCalib.StatusBorderPercentValues[1][1])           {             Blynk.setProperty(V2, "colore", BLYNK_GREEN);           } altro se ( MMeasure.per Cento[1] > MCalib.StatusBorderPercentValues[1][0])           {             Blynk.setProperty(V2, "colore", BLYNK_YELLOW);           } altro           {             Blynk.setProperty(V2, "colore", BLYNK_RED);           }           ritardo(100);           Blynk.virtualWrite(V2, MMeasure.per Cento[1]);         } altro         {           se (Calibrato)           {             Blynk.setProperty(V2, ""label, "Deaktiviert");             ritardo(100);             Blynk.virtualWrite(V2, 0);             ritardo(100);             Blynk.setProperty(V2, "colore", BLYNK_BLACK);           }           altro           {             Blynk.virtualWrite(V2, 0);             ritardo(100);             Blynk.setProperty(V3, "colore", BLYNK_BLUE);           }         }         pausa;       }     caso 2:       {         se ((MMeasure.DataValid[2]) & (Calibrato))         {           se ( MMeasure.per Cento[2] > MCalib.StatusBorderPercentValues[2][1])           {             Blynk.setProperty(V3, "colore", BLYNK_GREEN);           } altro se ( MMeasure.per Cento[2] > MCalib.StatusBorderPercentValues[2][0])           {             Blynk.setProperty(V3, "colore", BLYNK_YELLOW);           } altro           {             Blynk.setProperty(V3, "colore", BLYNK_RED);           }           ritardo(100);           Blynk.virtualWrite(V3, MMeasure.per Cento[2]);         } altro         {           se (Calibrato)           {             Blynk.setProperty(V3, "etichetta", "Deaktiviert");             ritardo(100);             Blynk.virtualWrite(V3, 0);             ritardo(100);             Blynk.setProperty(V3, "colore", BLYNK_BLACK);           }           altro           {             Blynk.virtualWrite(V3, 0);             ritardo(100);             Blynk.setProperty(V3, "colore", BLYNK_BLUE);           }         }         pausa;       }     caso 3:       {         se ((MMeasure.DataValid[3]) & (Calibrato))         {           se ( MMeasure.per Cento[3] > MCalib.StatusBorderPercentValues[3][1])           {             Blynk.setProperty(V4, "colore", BLYNK_GREEN);           } altro se ( MMeasure.per Cento[3] > MCalib.StatusBorderPercentValues[3][0])           {             Blynk.setProperty(V4, "colore", BLYNK_YELLOW);           } altro           {             Blynk.setProperty(V4, "colore", BLYNK_RED);           }           ritardo(100);           Blynk.virtualWrite(V4, MMeasure.per Cento[3]);         } altro         {           se (Calibrato)           {             Blynk.setProperty(V4, "etichetta", "Deaktiviert");             ritardo(100);             Blynk.virtualWrite(V4, 0);             ritardo(100);             Blynk.setProperty(V4, "colore", BLYNK_BLACK);           }           altro           {             Blynk.virtualWrite(V4, 0);             ritardo(100);             Blynk.setProperty(V4, "colore", BLYNK_BLUE);           }         }         pausa;       }     caso 4:       {         se ((MMeasure.DataValid[4]) & (Calibrato))         {           se ( MMeasure.per Cento[4] > MCalib.StatusBorderPercentValues[4][1])           {             Blynk.setProperty(V5, "colore", BLYNK_GREEN);           } altro se ( MMeasure.per Cento[4] > MCalib.StatusBorderPercentValues[4][0])           {             Blynk.setProperty(V5, "colore", BLYNK_YELLOW);           } altro           {             Blynk.setProperty(V5, "colore", BLYNK_RED);           }           ritardo(100);           Blynk.virtualWrite(V5, MMeasure.per Cento[4]);         } altro         {           se (Calibrato)           {             Blynk.setProperty(V5, "etichetta", "Deaktiviert");             ritardo(100);             Blynk.virtualWrite(V5, 0);             ritardo(100);             Blynk.setProperty(V5, "colore", BLYNK_BLACK);           }           altro           {             Blynk.virtualWrite(V5, 0);             ritardo(100);             Blynk.setProperty(V5, "colore", BLYNK_BLUE);           }         }         pausa;       }     di default:       {         se ((MMeasure.DataValid[5]) & (Calibrato))         {           se ( MMeasure.per Cento[5] > MCalib.StatusBorderPercentValues[5][1])           {             Blynk.setProperty(V6, "colore", BLYNK_GREEN);           } altro se ( MMeasure.per Cento[5] > MCalib.StatusBorderPercentValues[5][0])           {             Blynk.setProperty(V6, "colore", BLYNK_YELLOW);           } altro           {             Blynk.setProperty(V6, "colore", BLYNK_RED);           }           ritardo(100);           Blynk.virtualWrite(V6, MMeasure.per Cento[5]);         } altro         {           se (Calibrato)           {             Blynk.setProperty(V6, "etichetta", "Deaktiviert");             ritardo(100);             Blynk.virtualWrite(V6, 0);             ritardo(100);             Blynk.setProperty(V6, "colore", BLYNK_BLACK);           }           altro           {             Blynk.virtualWrite(V6, 0);             ritardo(100);             Blynk.setProperty(V6, "colore", BLYNK_BLUE);           }         }         break;       }   } // Termine Interruttore di
}

vuoto Get_Moisture_DatainPercent()
{   byte CalibDataOffset = 0;   per (byte io = 0; ho < AttachedMoistureSensors; ho++)   {     CalibDataOffset =  ho * 2;     int RawMoistureValue = ReadMoistureSensor_Raw_Val(io);     se ((MCalib.Dati[CalibDataOffset] == 0) || (MCalib.Dati[CalibDataOffset + 1] == 0)) // MinADC Valore maxADC ADC Valore     {       MMeasure.per Cento[i] = RawMoistureValue;       MMeasure.DataValid[io] = false;     } else     {       RawMoistureValue = MCalib.Dati[CalibDataOffset + 1] - RawMoistureValue;       RawMoistureValue = MCalib.Dati[CalibDataOffset] + RawMoistureValue;       MMeasure.per Cento[ho] = la mappa(RawMoistureValue, MCalib.Dati[CalibDataOffset], MCalib.Dati[CalibDataOffset + 1], 0, 100);       se ((MMeasure.per Cento[i] > 100 ) | (MMeasure.per Cento[i] < 0 ))       {         MMeasure.per Cento[i] = RawMoistureValue;         MMeasure.DataValid[io] = false;       } else  {         MMeasure.DataValid[io] = vero;       }     }   }   ritorno ;
}

void Run_MoistureSensors (bool Init)   // HauptFunktion zum der Betrieb Bodenfeuchtesensoren
{   byte MinSensValue = 100;   se ((millis() - Moisure_ServiceCall_Handler >= MoisureSens_Poll_Interval) | (Init))   {     Moisure_ServiceCall_Handler = millis();     Get_Moisture_DatainPercent();     per (int io = 0; ho < AttachedMoistureSensors; io++)     {       se (MMeasure.DataValid[io])       {         se (MMeasure.per Cento[i] != MMeasure.Old_Percent[ho])         {           MMeasure.Old_Percent[ho] = MMeasure.per Cento[io];           se (MMeasure.per Cento[i] < MinSensValue ) {             MinSensValue = MMeasure.per Cento[i];           };           Serial.print(F("Feuchtigkeitswert Sensore "));           Seriale.di stampa(i);           Serial.print(F(" in Prozent :"));           Serial.stampa(MMeasure.Percentuale[ho]);           di Serie.println(F(" %"));           Update_Blynk_APP(ho, Sens_Calib);    // Aktualisiere Handywerte         }       } altro       {         Update_Blynk_APP(ho, Sens_NOTCalib);    // Aktualisiere Handywerte         Seriale.di stampa(F("Sensore "));         di Serie.stampare(i);         Serial.print(F(" nicht kalibiert. Bitte kalibrieren. Rohdatenwert:"));         Serial.println(MMeasure.per Cento[i]);       }     }     Update_Local_Display();           // Aktualisiere lokales Pflanzenwächter Display (Led)   }
}

// Loop Principale
void loop()
{   Run_MoistureSensors(false);   Blynk.eseguire();   // / Esegue Blync di Base - Funzioni
}
Es ist vor dem hochladen auf unseren ESP zu beachten, das seguenti Parametri/Codezeilen an die jeweiligen bisogni della riadattato werden dobbiamo:
int Dati[MaxSensors*2] = {0,0,0,0,0,0,0,0,0,0,0,0,};
Werte bitte gemäß Beschreibung in Teil 1 der Reihe anpassen.
#definire MoisureSens_Poll_Interval 300000
Intervall zwischen zwei Bodenfeuchtemessungen in Millisekunden. Il Valore ha Influenza, come spesso i dati mobili vengono aggiornati, e di conseguenza anche il volume di dati che per la Trasmissione a Tempo aggiuntivo. Più alta, la più grande Intervallo. Si prega su un Valore al proprio volume di dati o di Budget. [Esempio: 300000 ms = 5 Minuti Datenübertragungsintervall}
char auth[] = "xxxxxxxxxxxxxxxxxxxxxxxxxxxxxxxx";
char ssid[] = "Deine_WLAN_SSID";
char pass[] = "il Tuo _WLAN _password!";
Valori come descritto nella Parte 2 della Serie regolare.
Ci possono essere i seguenti Parametri/di Righe di codice, a Esigenze specifiche:
String SensorName[MaxSensors] = {"Pianta 1","Pianta 2","Pianta 3","Pianta 4","Pianta 5","Pianta" A 6",};
Feuchtesensorname in APP come Intestazione viene visualizzato.
byte StatusBorderPercentValues[MaxSensors*2][2]= { {10,50}, .....
Matrice bidimensionale per Prozentgrenzwerte (Semaforo) singolarmente per Sensore di umidità (1 -6). Influenza il "Semaforo" Visualizzazione e la Visualizzazione dei Valori in APP. Primo Chi (10) il contorno di transizione tra lo Stato di "rosso" e lo Stato "giallo" in. Il secondo Valore indica il contorno di transizione tra lo Stato di "giallo" e lo Stato "verde" in. Esempio: dal 51 % di Umidità del suolo "verde", a partire dalle 9% di Umidità del suolo "rosso".
Se tutti i Parametri siano corretti stato definito l'Output sul Monitor seriale, come segue:

Nota: In questo Esempio, invece di max6. solo 5 Sensori
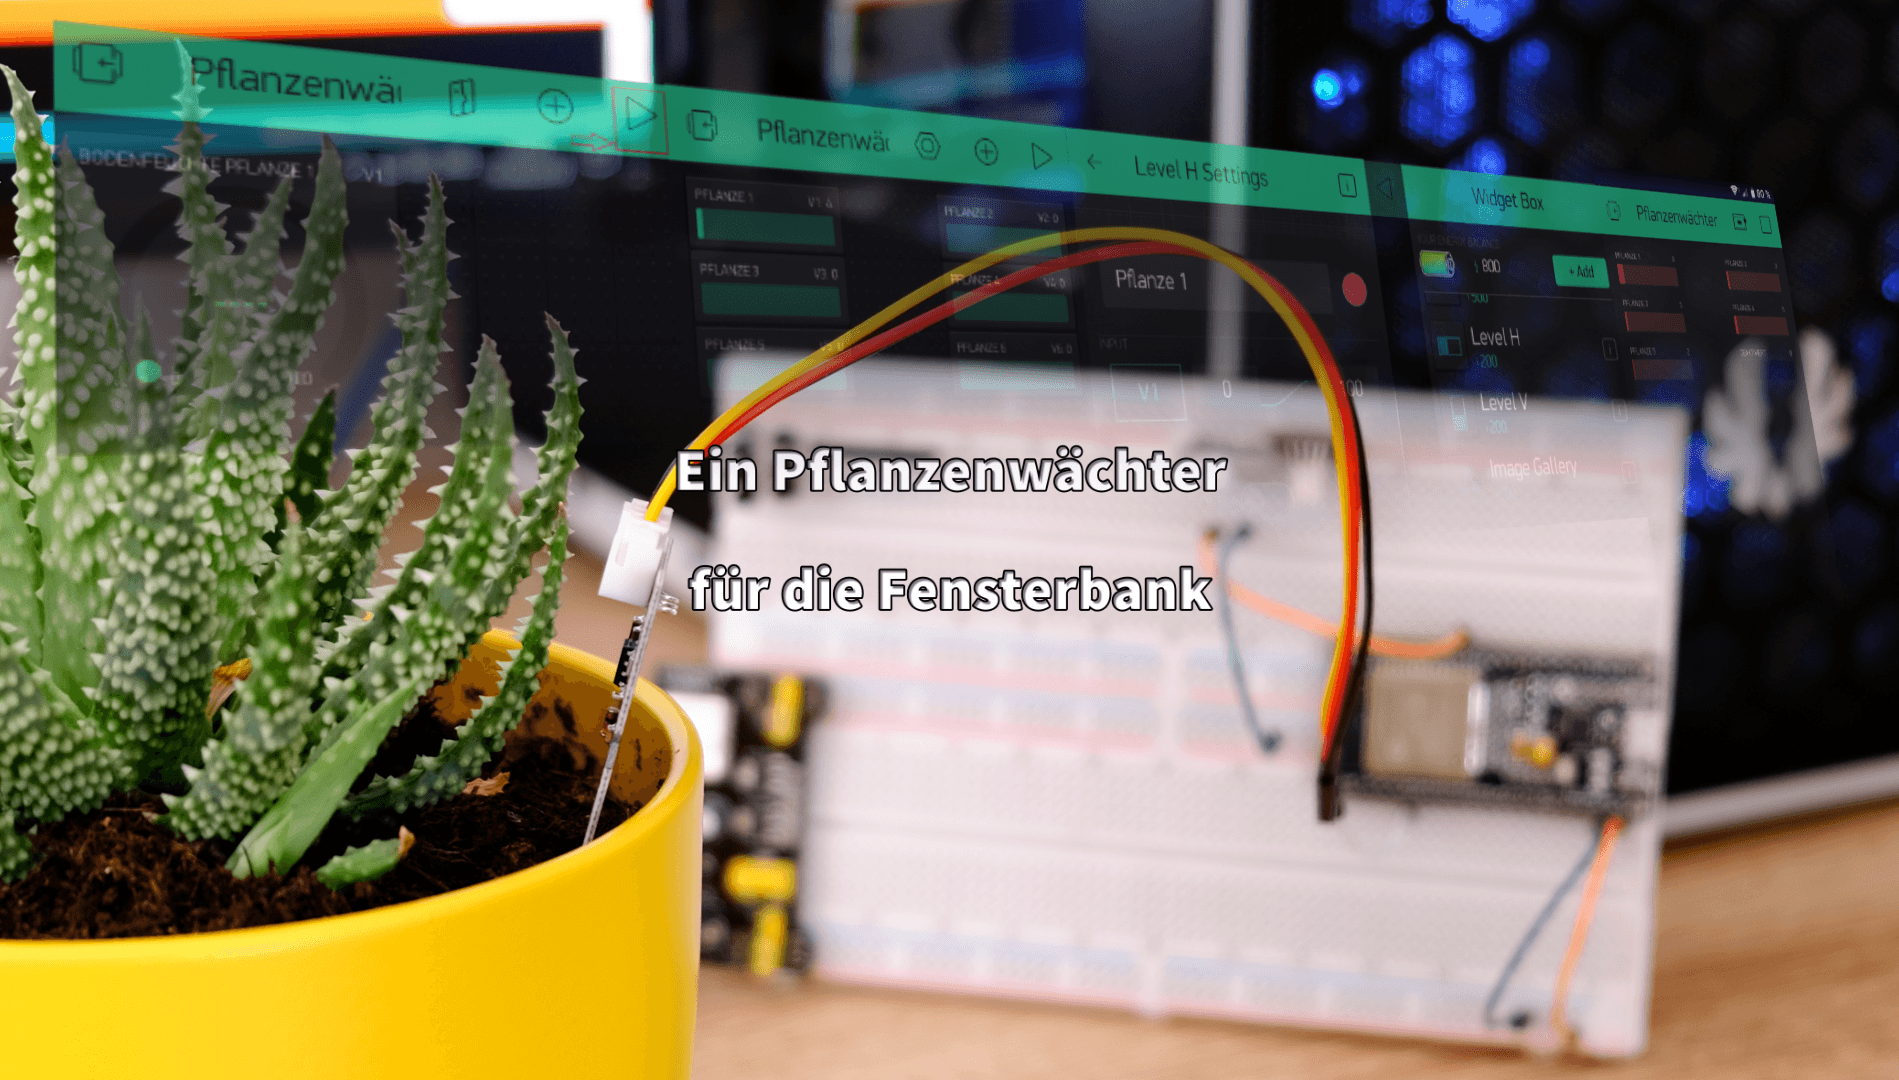
successivamente, abbiamo bisogno dei nostri HandyApp ancora che ad una modifica Hardware e Firmware personalizzato.
Poiché nella nostra Blynk HandyAPP solo 2000 Punti messi gratuitamente a Disposizione, abbiamo bisogno di 6 Sensori collegati qualcosa di famiglie. Nella prima Fase abbiamo eliminato pertanto, nella seconda Parte del creato "Gauge" Elemento.

Il "Gauge" Elemento che andrà a sostituire il "Livello H" Elemento

Ora aggiungiamo, quindi, per la Visualizzazione della corrente di Umidità del suolo, il Energiegünstigere Elemento "Livello H" per un totale di 6 volte per aggiungere.

Ora, se la nostra Superficie di circa apparire così:

Ora abbiamo ancora bisogno di tre Valori, rispettivamente, nelle Proprietà dei 6 Elementi di personalizzazione. In modo esemplare, mi mostra le Impostazioni per il primo Sensore

La modifica principale è l'Input Variabile. Questa deve essere continuamente per ogni "Livello H" Elemento che vanno da Input "V1" per Pianta 1 fino a "V6" per Pianta 6 da definire. "V" sta per "Virtuali Pin" e permette di eseguire il Mapping tra gli Elementi delle APP e delle Istruzioni contenute nel Codice. Comunque prendiamo come valore Minimo 0 e Massimo 100. Come terzo definiamo come Reading Rate "Push" un. Il Design possono essere di qualsiasi Colore, di qualsiasi Dimensione e di qualsiasi Nome scelto, poiché questi Parametri, successivamente, attraverso il nostro Programma di ESP impostato o essere definito.
Il Risultato finale, in caso di Attivazione del Progetto, ora dovrebbe essere simile a quanto segue:

(l'ultimo Sensore è disattivato, in quanto io ad Esempio solo 5 Sensori ho. In caso di Utilizzo di 6 Sensori, il Campo viene automaticamente attivata)
per Ulteriori Informazioni sulle Blynk APP e il loro Utilizzo nella Controller consulta
- Blynk Introduzione -> https://www.blynk.cc/getting-started
- Documentazione -> http://docs.blynk.cc/
- Sketch Generatore -> https://examples.blynk.cc/
- più Recente Blynk Libreria -> https://github.com/blynkkk/blynk-library/releases/download/v0.6.1/Blynk_Release_v0.6.1.zip
- Più Blynk server -> https://github.com/blynkkk/blynk-server/releases/download/v0.41.5/server-0.41.5.jar
- Blynk Home -> https://www.blynk.cc
Mi auguro tanto Divertimento durante Decodificare, e fino alla prossima Volta.


11 commenti
AZ-Delivery Team
Hallo Yarak😊
vielen Dank für deine Nachricht! Hier ist der Link zum eBook des Pflanzen-Sets, in dem die automatische Gießanlage Schritt für Schritt erklärt wird:
https://www.az-delivery.de/products/pflanzen-bewasserung-set-mit-bodenfeuchteerkennung-sensor-automatisches-bewasserungsmodul-diy-kit-automatische-wasserpumpe
Bitte beachte jedoch, dass das eBook inhaltlich eher für Erwachsene konzipiert ist und nicht speziell für Kinder. Je nach Alter der Kinder kann es daher sein, dass sie etwas Unterstützung beim Durchgehen der Anleitung benötigen.
Ich hoffe, das hilft euch weiter – und viel Erfolg bei eurem Projekt! 🌱
Yarak
Gibt es denn keine Anleitung für die automatische Gießanlage? Meine Kinder sind gerade am verzweifeln, da sie es für ein Projekt in der Schule bräuchten.
Gruß
Yarak
Tobias
Hallo Peter,
Da dis ein komplett anderen Anwendungsfall darstellt, würde ich empfehlen hier die Blynk Dokumenation als Basis für den Neuaufbau eines eigenen Sketches zu nutzen.
Gruß
Tobias
Tobias Kuch
Hallo Max,
Grundsätzlich schon, jedoch ist dann auch eine komplette Umprogrammierung der Software erforderlich. Die Software als solches ist nur auf dem ESP32 so ausführbar.
Gruß
Tobias
Max
Hallo und danke für das SUPER Projekt. Ich suche schon lange etwas ähnliches, bei dem ich die Bodenfeuchtigkeit messen kann und damit dann eine automatische Bewässerung steuern kann.
Natürlich kann ich nur Teile aus diesem Projekt verwenden, aber besonders die Handy-App-Anzeige und die Anzahl der Sensoren ist super.
Für meinen Anwendungsfall benötige ich allerdings 8-10 Feuchtigkeitssensoren und zusätzlich noch 4 Eingänge für Füllstandsschalter (Reedkontakt).
Kann man das Projekt mit einer anderen Hardware auf die genannten Sensoren und Eingänge bringen?
Bis Bald
Max
Peter
Habe den Pflanzenwächter gebaut und es funktioniert alles perfekt. Jetzt habe ich eine ganz andere Sache vor. Wie kann ich den Sketch umändern, damit von zwei Spannungs-und zwei Stromsensoren die Werte in der Blynk-App angezeigt werden?
Tobias Kuch
Hallo Knut,
Die Sensoren werden mit 5 Volt betrieben, der Rest mit 3,3 Volt. Sorry für die verspätete Antwort. Du kannst alle Projekte mit Plänen im Fritzing Format (Inkl. Werteangaben) unter meiner GitHub Seite https://github.com/kuchto herunterladen.
Viele Grüße
Knut Dorendorff
OK dann hierzu keine Antwort.
Mit wieviel Volt wird was auf dem Board was betrieben? 3,3 oder 5 Volt?
Mit freundlichen Grüßen
Knut Dorendorff
Knut Dorendorff
Hallo Tobias,
welche Widerständen kommen zwischen Minus und dem ESP32. Da wir sechsmal 47 kΩ und 130 kΩ haben. Oder ist da egal?
Mit freundlichen Grüssen
Knut
Danke schon mal.
Tobias
Hallo Martin,
Leider funktioniert das Projekt nicht nativ mit dem ESP8266, da dieser nur einen Analog-Port besitzt, wir aber sechs Ports brauchen, aber auch, weil der Analog Port des ESP8266 eine fixen Eingangsbereich von 0 – 1 Volt hat. Diesen sehe ich i.m.h.o als zu gering für unsere Zwecke an. Du könntest theoretisch jedoch einen externen I2C AD Wandler an des ESP8266 hängen. Jedoch muss der Großteils danach angepasst werden. Insgesamt ist es aber mit sehr viel Aufwand möglich es zu portieren. Auch bringt der externe AD Wandler Extrakosten mit sich.
Martin
Hallo Tobias,
würde dein Projekt auch mit einem NodeMCU Lua Lolin V3 Modul mit ESP8266 12E funktionieren?