
In the first part You have installed a PC or a Raspberry Pi with Openhab from this series. Openhabian was selected as the basis for this since the installation on Debian-based Linux operating systems is quite simple and the later use of Raspberry Pi OS is similar. The installation does not take long, but the add-ons, which are actually called Bindings in Openhab, may have already been installed. In today's part, an MQTT broker is to be installed on the system and the corresponding devices are set up. The hardware should then be used to record environmental data. Communication will be password-protected so that the data cannot see or overwrite by everyone. In order for the data to be assigned to a room, an example house will serve as a model.
Required hardware and software
A finished installation of Openhab is required for this part. For the hardware, environmental data from BME280S, and the hardware from Table 1 are required. In general, your hardware should have access to your network.
|
POS |
Number |
Component |
link |
|
1 |
1 |
D1 Mini |
|
|
2 |
1 |
Gy-bme280 barometric sensor |
Table 1: required hardware for this blog part
The installation of a MQTT broker
For our project to use the above-mentioned hardware to record environmental data, a communication interface between Openhab and the Devices is required. Universal, especially with a view of later extensions, MQTT is my first choice here. I gave an overview of MQTT in an earlier blog post, this can here read. We will now reinstall the Mosquitto broker on the Raspberry Pi.
If you, like me, access the Raspberry Pi via SSH, then you need the following default login data:
- User: Openhabian
- Password: Openhabian
All default access can be found on the Openhab page In the area of passwords, see Image 1.

Image 1: The default login data of all services
Next, install the Mosquitto broker with the command of Code 1.
sudo apt install mosquitto
Depending on the internet line, the installation takes a short moment, the status can be requested using Code 2.
sudo service Mosquitto Status
Ideally, in the area Active the status Active (running) stands, see Image 2.

Image 2: Status of the MQTT-Broker, here Active
If this is the case, the broker is set up and can be used by any client. However, this carries the risk that everyone can read and change the data with access to the network and an MQTT client. Especially in the area of home automation, this can have unpleasant consequences, which is why access should be limited by a password!
So before MQTT is used, it is adjusted a little in the configuration. To do this, enter the order from Code 3 in the terminal.
sudo nano /etc/mosquitto/mosquitto.conf
Code 3: Command to change the configuration of MQTT
Then expand or change the following entries:
per_listener_settings true
Allow_anonymous false
password_file/etc/mosquitto/passwords
After that, the MQTT configuration should look as follows, see Image 3.
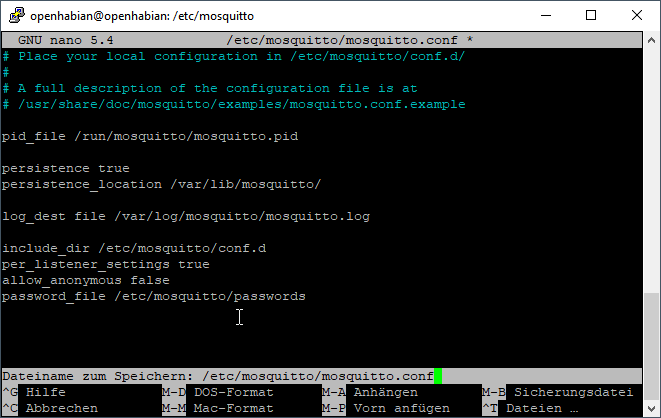
Image 3: Expansion of the configuration for MQTT protection
Before the service can be restarted, the password file must be generated! If you try to restart the service beforehand, an error will occur and the service does not start. Therefore, we now initially create the file, where we also enter a user, see Code 4.
sudo mosquitto_passwd -c /etc/mosquitto/passwords User
When commanding, exchange the user for a name chosen by you and press Enter. Immediately afterward you will be asked for a password and must confirm it, see Image 4.

Image 4: Create the password file with the new user
At this point, it is important that you either remember the password or use a password database. The passwords awarded can be read out without some know-how because the logins are encrypted!
Save the change and restart the service completely, see Code 5.
sudo service mosquitto Stop
sudo service Mosquitto Reload
sudo service mosquitto begin
Code 5: Stop Mosquitto and start again with a new configuration
So that you can add other users because devices should get different users and passwords, use the command from code 6.
sudo mosquitto_passwd -b /etc/mosquitto/passwords User password
Code 6: Add further MQTT selection data
It is important to exchange the user and the password so that you meet your wishes.
The MQTT broker is thus set up and it can now be used for Openhab.
Create our example house in Openhab
Now there is a somewhat practical part of Openhab in this article. In this example, a small example house is to be created that looks like this:
- Ground floor
- Kitchen
- Living room
- dining room
- Guests toilet
- Utility room
- Upper floor
- bathroom
- Washroom
- 2 Bedrooms
- Garden
- Gardening
- terrace
Now open the Openhab page and, if required, enter the Adminkonto, including the password. Then switch to the left Ideas and Model, see Image 5.

Image 5: Call up page model
As in my screenshot, this page is still empty and the required hierarchy must now be created. Openhab offers you the following options:
- Inserting a location: this means surroundings, floors, and rooms
- Intetting equipment of an object: This creates a specific object, b. a aquarium. At the same time, it also creates a so-called point, which are objects, e.g. to display measured values, or to integrate switches. This is linked to a connected binding at the same time.
- Add one point to an object: As mentioned above, it means an object to display measured values, or e.g. a switch. This is linked to a connected binding at the same time.
- Add equipment: Add an object to a location that does not contain any data points
- Add the point: add a (data) point to a location or equipment
So let's start building the example house so that we can later add our environmental data.
Select "Add Location" on the right side and indicate the specifications as shown in Figure 6.

Image 6: Add location
At this point, I should mention that the house and garden will be on the same level in the later hierarchy. Unfortunately, there is a lot in English with this configuration. The new location is then added with “Create”.
Now click on the open space under House And choose "add location" again, important point is that a free area under House was clicked, otherwise, the new location will be created as the sub-item by the house. They used the requirements from Image 7 for the garden.
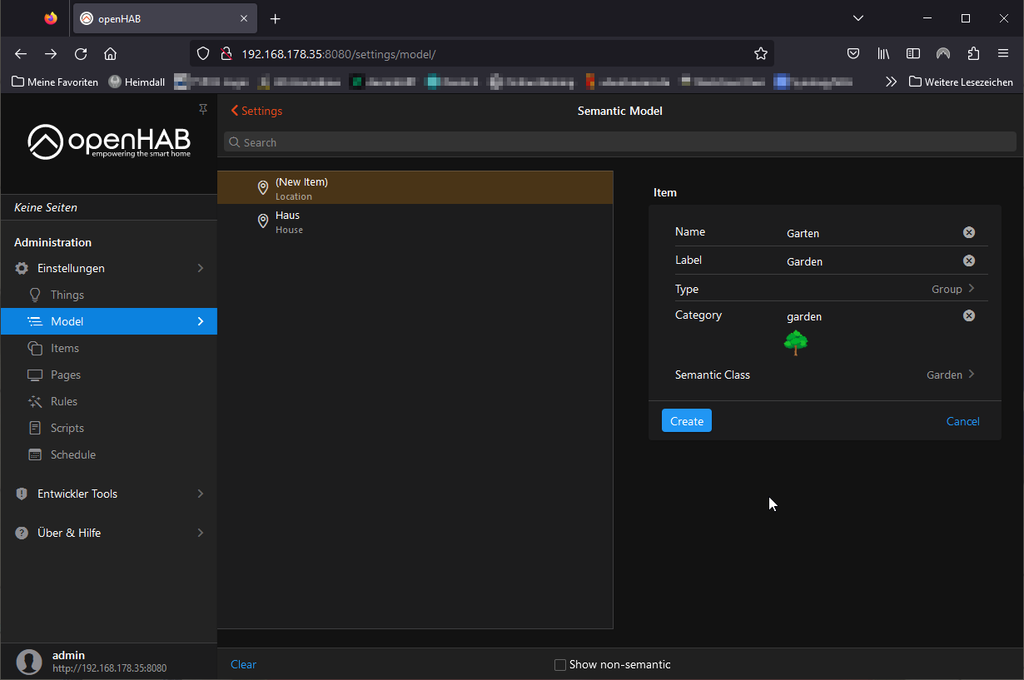
Image 7: Create a location garden
After that, you should have two locations for our model house, see Image 8.

Image 8: Beginning of the hierarchy
In the garden, so I set it at the beginning, there will be a terrace and a garden hut. Both belong to the garden, which is why the "garden" is now selected in the hierarchy and a new element for the terrace is created again, see Image 9.
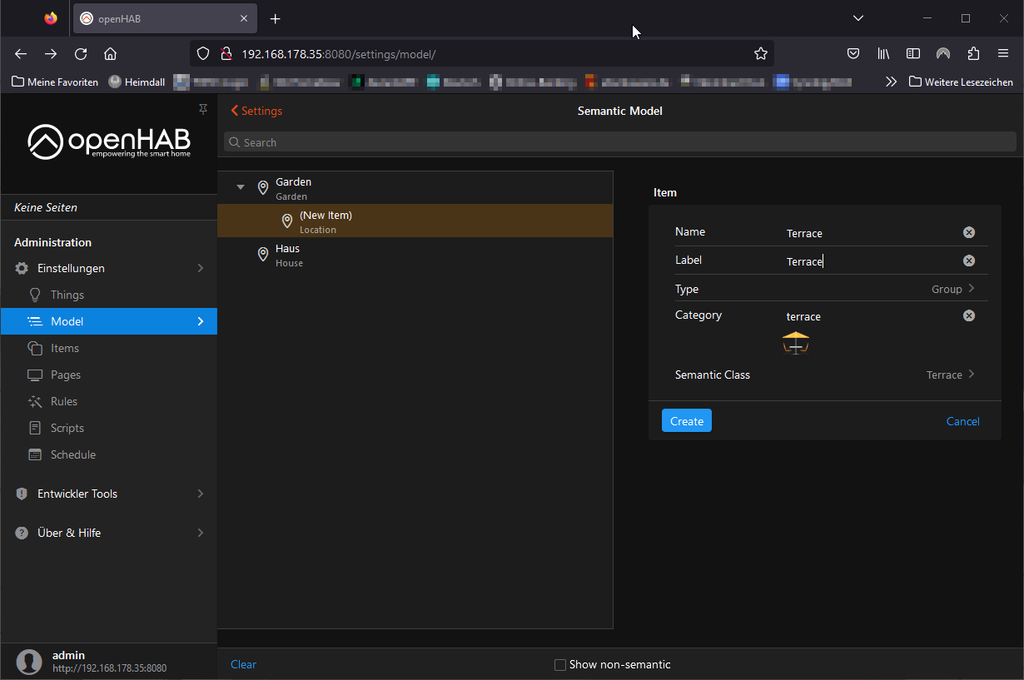
Figure 9: Add terrace
Next, the garden hut will take place, which is why you first select the "garden" again and then add a new location, see Image 10.
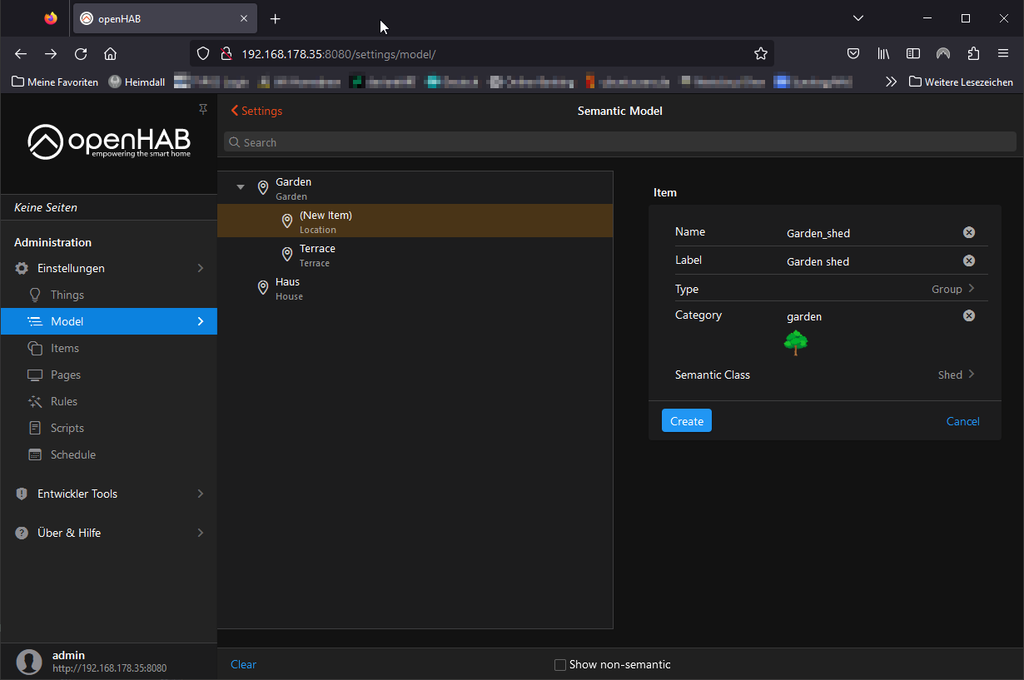
Image 10: Add garden hut
This sets all relationships and the outdoor area is created. It is important for later: Easy to move the locations is not possible. Therefore, you have to think about the arrangement in advance. The labels, the category, and the semantic class can be edited later.
Now, as already described, expand the model around the areas of the house. Check out which categories are available for the individual rooms. You can change your selection later. If you are ready by putting on the rooms, the model should correspond roughly to Image 11.

Image 11: Model with all rooms
Create the binding for MQTT
So that data can also be used at Openhab later, this blog series MQTT uses the primary interface. An MQTT broker was set up at the beginning, but so far Openhab has no connection to the broker. In the ribbon, you can now switch to Ideas -> Things And choose the "+" in the lower right corner there, see Image 12.

Image 12: Open Things menu
In the next menu, since the MQTT Binding was added during the installation, you have to select the MQTT Binding, see Image 13.

Image 13: Select MQTT binding
Now select the MQTT broker directly in the next area, as the connection to the broker must first be established before we can access data. In the following menu, it now depends on whether you have secured your MQTT broker or not. If it is only permitted to write and read data by user and password, you have to Show Advanced Select, see Image 14.

Image 14: Laying extended settings
Regardless of whether you are better secured or not, you will have to enter the broker's IP address next. If, as I have shown in this blog post so far, you have been running the MQTT broker on the same system, you can be as Broker hostname/IP simply local host or enter 127.0.0.1.
If users and passwords are still needed, they have to scroll a little further down to the User name and password to enter the correct data, see Image 15.

Image 15: Enter the user and password for MQTT
Once that is done, scroll down even further down and press the button Create Thing. The connection can take a short moment. However, you should quickly see that Openhab was able to connect to the MQTT broker, which was due to the green button that can be seen online, see Image 16

Image 16: Connection to the MQTT broker established
Environmental monitoring with the D1 Mini and BME280
In order to record the environmental data for a room that should later be seen in Openhab, a D1 Mini with BME280 is required for our post. Since these are standard components in my craft box, the assembly is quickly done, see Image 17.

Image 17: D1 Mini with connected BME280
The code is also written very quickly and reads the environmental data every 2 seconds from the BME280. So that the latest is not always written to the broker, the following conditions apply for sending:
- The temperature difference to the new value is 0.1 ° C
- The pressure difference to the new value is 0.5 bar
- The air humidity difference to the new value is 0.5 %
of the previous value.
//----------------------------------------------------- // D1 mini with bme280 to monitor temp, humi and press // via MQtt for Openhab // Author: Joern Weise // License: GNU GPL 3.0 // Created: Feb 02, 2023 // Update: Feb 03 2023 //----------------------------------------------------- #include <Adafruit_bme280.H> #include <Wire.H> #include <Pub.H> // lib for mqtt pub and sub #include <ESP8266WIFI.H> // Define wifi settings #ifndef Stassid #define Stassid "Your-SSID" // Enter wfi name #define Stacksk "Your-WiFi-Pass" // Enter Passkey #endif #ifndef Mqttuser #define Mqttuser "Your-MQTT-user" // Enter wfi name #define MQttpass "Your-MQTT-PASS" // Enter Passkey #endif #define Advancediag 0 #define I2C_SDA D2 #define I2C_SCL D1 #define Nextupdate 2000 #define Templimit 85.00 // objects for i2c and bme Adafruit_bme280 Bmeone; unsigned long load time = 0; const char* Mqtt_broker = "IP-from broker"; // Name of the MQTT Broker const char* PuBtopic tempone = "Sensors/out/d1_mini_office/Temponic"; // Topic first temp const char* Puffo = "Sensors/out/d1_mini_office/pressone"; // Topic First Pressure const char* Puffy = "Sensors/out/d1_mini_office/Humone"; // Topic first humidity String clientid = "D1_Mini_Office"; // Client name for MQTT-Broker float river pace,river,river hum; // Create objects for mqtt Wificlient Espclient; Pub MQttclient(Espclient); #define Msg_buffer_size (50) char MSG[Msg_buffer_size]; void set up() { // put your setup code here, to run once: Serial.Begin(115200); Serial.print("Bme280 test"); Serial.print("Init Both I2C Connections"); Wire.Begin(I2C_SDA, I2C_SCL); Serial.print("Make First Bme Talking to Us"); Bool botstatus; // init first sensor botstatus = Bmeone.Begin(0x76); IF (!botstatus) { Serial.print("Could not find a valid bme280 - 1 sensor, check wiring!"); while (1); } Else Serial.print("Valid BME280 - 1 sensor!"); WriteadVancediag("Init wifi", true); setupwifi(); WriteadVancediag("Init WiFi - Done", true); WriteadVancediag("Set MQTT-Server", true); MQttclient.set server(Mqtt_broker,1883); WriteadVancediag("Set Callback Function", true); //mqttclient.setcallback( Callback); WriteadVancediag("Finish Setup ()-Function", true); } void loop() { // put your main code here, to run repeatedly: float ftempone,fpressone,fhumone; IF(!MQttclient.connected()) reconnectmqtt(); MQttclient.loop(); // check after "nextupdate" if values has changed IF(Millis() - load time > Nextupdate) { ftempone = Bmeone.readTemperature(); //Get temp one if(fTempOne > float(TEMPLIMIT)) { return; } fPressOne = bmeOne.readPressure() / 100.0F; //Get press one fHumOne = bmeOne.readHumidity(); if(fTempOne != fLastTempOne && abs(fLastTempOne - fTempOne) > 0.1) //Check temp one changed and send { snprintf(msg,MSG_BUFFER_SIZE, String(fTempOne,1).c_str()); //Convert message to char mqttClient.publish(PubTopicTempOne,msg,true); //Send to broker writeAdvanceDiag("Send Temp one: " + String(fTempOne,1), true); fLastTempOne = fTempOne; } if(fPressOne != fLastPressOne && abs(fLastPressOne - fPressOne) > 0.5) //Check pressure one changed and send { snprintf(msg,MSG_BUFFER_SIZE, String(fPressOne,2).c_str()); //Convert message to char mqttClient.publish(PubTopicPresOne,msg,true); //Send to broker writeAdvanceDiag("Send Press one: " + String(fPressOne,2), true); fLastPressOne = fPressOne; } if(fHumOne != fLastHumOne && abs(fLastHumOne - fHumOne) > 0.5) //Check pressure one changed and send { snprintf(msg,MSG_BUFFER_SIZE, String(fHumOne,2).c_str()); //Convert message to char mqttClient.publish(PubTopicHumOne,msg,true); //Send to broker writeAdvanceDiag("Send Hum one: " + String(fHumOne,2), true); fLastHumOne = fHumOne; } lastTime = millis(); } } /* * ================================================================= * Function: callback * Returns: void * Description: Will automatical called, if a subscribed topic * has a new message * topic: Returns the topic, from where a new msg comes from * payload: The message from the topic * length: Length of the msg, important to get conntent * ================================================================= */ /* void callback(char* topic, byte* payload, unsigned int length) { String stMessage = ""; writeAdvanceDiag("Message arrived from topic: " + String(topic), true); writeAdvanceDiag("Message length: " + String(length), true); for (int i = 0; i < length; i++) stMessage += String((char)payload[i]); writeAdvanceDiag("Message is: " + stMessage, true); //Map value and send the mapped value to mqtt broker int iValue,iMapValue; iValue = stMessage.toInt(); iMapValue = map(iValue,0,1024,0,255); snprintf(msg,MSG_BUFFER_SIZE, "%1d",iMapValue); //Convert message to char writeAdvanceDiag("Send mapped PotiValue: " + String(iMapValue), true); mqttClient.publish(PubTopicPotiMap,msg,true); //Send to broker } */ /* * ================================================================= * Function: setupWifi * Returns: void * Description: Setup wifi to connect to network * ================================================================= */ void setupWifi() { Serial.println("Connection to: " + String(STASSID)); WiFi.mode(WIFI_STA); WiFi.begin(STASSID, STAPSK); while (WiFi.status() != WL_CONNECTED) { delay(500); Serial.print("."); } Serial.println(""); Serial.println("WiFi connected"); Serial.println("IP address: "); Serial.println(WiFi.localIP()); } /* * ================================================================= * Function: writeAdvanceDiag * Returns: void * Description: Writes advance msg to serial monitor, if * ADVANCEDIAG >= 1 * msg: Message for the serial monitor * newLine: Message with linebreak (true) * ================================================================= */ void writeAdvanceDiag(String msg, bool newLine) { if(bool(ADVANCEDIAG)) //Check if advance diag is enabled { if(newLine) Serial.println(msg); else Serial.print(msg); } } /* * ================================================================= * Function: reconnectMQTT * Returns: void * Description: If there is no connection to MQTT, this function is * called. In addition, the desired topic is registered. * ================================================================= */ void reconnectMQTT() { while(!mqttClient.connected()) { writeAdvanceDiag("Login to MQTT-Broker", true); if(mqttClient.connect(clientID.c_str(), MQTTUSER, MQTTPASS)) { Serial.println("Connected to MQTT-Broker " +String(MQTT_BROKER)); //writeAdvanceDiag("Subscribe topic '" + String(SUBTOPIC)+ "'", true); //mqttclient.subskribe(subtopic,1); // Subscibe topic "subtopic" } Else { WriteadVancediag("Failed with rc =" +String(MQttclient.state()), true); Serial.print("Next Mqtt-Connect in 3 Sec"); delay(3000); } } }
In order for the program code to work for you, it must still be adjusted. First, you have to correctly set the WLAN, which is about the defined Stassid and Stacksk is carried out.
After that, the user and the password for MQTT must be via the definition Mqttuser and MQttpass To be defined. Finally, you can still the paths for MQTT and the clear clientid below Definitions to Publish Values to Broker and Clientid change.
If there are problems, I have installed a kind of debug mode in the code that can output information on the serial monitor at important places. Set Advancediag From 0 to 1 and the extended edition is displayed.
To view the data, I used to use MQTT.FX in the past, but unfortunately this tool is no longer free of charge, which is why I am too MQTT Explorer I switched. With the current 0.4.0 beta, I have significantly more functions than before MQtt.fx.
Assign the environmental data to a space
In this blog post, we have currently created the model of a house with various rooms and integrated an MQTT broker that provides us with environmental data from a D1 Mini with BME280. The data must now be linked to one room in Openhab. At the moment Openhab has only a connection to the MQTT broker, but no knowledge of the different data nodes.
Open, as when adding the MQTT broker, open the Ideas and then Things. There you choose that Blue Plus on the lower right edge and then MQTT Binding, see Figure 18.

Image 18: Add new MQTT Binding
Next, choose Generic Mqtt Thing from, see Image 19. You can only select this point if a broker has been set up beforehand, see the text by Generic MQTT Thing.

Image 19: Add a generic MQTT thing
In the next dialogue, the thing must first be assigned a clear name, optionally a label and for which location it is intended, see Image 20.
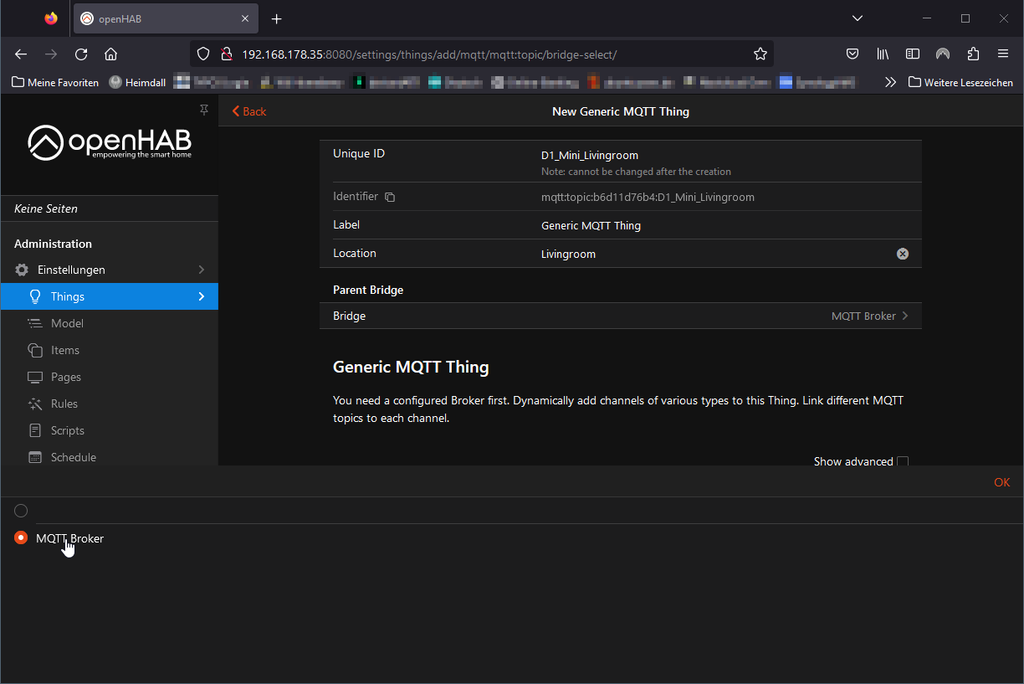
Image 20: Generic MQTT Thing configure
It is important that you Parent Bridge Set on the previously set up MQTT broker. Otherwise, the topics cannot be read out. Then press on Create Thing in the newly charged overview, and select the newly created element directly, see Image 21.

Image 21: Select the newly created thing in the overview
If the thing is open, select the day Channel from and there the menu item Add Channel, see Image 22.

Image 22: Channel add to the thing
Now a channel name and a label must first be awarded. The temperature should be added, which is why the Channel Identifier Temperature should be. As a label, I take the location Living room. In this case, the guy is one Number value that must be selected beforehand so that the further configuration is displayed. Then carry the MQTT State Topic one, see Image 23.

Image 23: Add Channel Dates
According to the same principle, they create channels for pressure and humidity. Make sure that you take over the correctly used topic from the ArduinoCode, or get the Topic via MQTT Explorer, or MQTT.FX again. Ultimately, the channel overview should look like Image 24.

Image 24: Channel of the D1 Mini
Now Openhab receives a notification directly when the topic is changed and the channel is updated. Finally, the thing is now linked to the model. To do this, switch to Model and choose that in the list Living room, see Image 25.

Image 25: Give the Model values
Press CREATE POINTS FROM Thing And then select the thing. A drop-down menu will appear here, where you get a selection of all things. Now you see, see Image 26, all available data.

Image 26: Data points of the thing
Select all and assign the corresponding category Temperature, pressure, and humidity for the individual data points. You should also adapt the label accordingly so that you will then know which data point reproduces which value, see Image 27.

Image 27: Data points assigned to the living room
If you now want to get the values with the unit, then you can add under Add Metadata still a State description.
I recommend:
- Patterns for temperature: %.1f ° C
- Patterns for printing: %.2f HPA
- Patterns for moisture: %.2f %%
You can even indicate for all three data points when creating the patterns at the top right that the values are only Read only are.
After that, the values should look like in Image 28.

Image 28: Data point with unit
Summary
In this article you have set up an MQTT broker on the Raspberry Pi created a model of an example house or apartment and assigned the environmental data that a D1 mini with BME280 collects. Adding the MQTT binding is a bit tricky, but with a little practice you understand the principle quite quickly. As in the first post mentioned to this series, every single step must be configured in Openhab, which starts many users at the beginning. I think in this post you noticed what this meant. The learning curve is steep, but if you have mastered the entry, the further path is quite easy.
In the next post we will deal with the bindings deeper. I show how to integrate a Shelly into your system and create programming with blockly. In the following fourth and thus final part, the AZ TouchMod is used as a control unit.
Since I now call a small CNC milling machine my own, you can find in mine Git repository A circuit board for the D1 mini with BME280, see Figure 18.

Figure 29: Board for D1 Mini with BME280
This is in Target 3001! has been created and will soon be missed a 3D pressure housing. The D1 is therefore well protected and it does not look like prototyping.


2 Reacties
Thorsten
Vielen Dank für dieses wirklich gelungene Projekt!!!
Ich habe unzählige Stunden nach einer Dokumentation gesucht, aber irgendwie passte das alles nicht. Mit deiner Beschreibung hat es super geklappt.
Dan
Vielen Dank für diese beiden Artikel, die mir bei der Implementierung von Openhab enorm geholfen haben. Ihr Beispiel mit ESP8266 ist für mich umso interessanter, da meine Wetterstationen damit entworfen wurden. Ich werde nun meine Wetterstationen von Domticz zu Openhab migrieren.