
Hello everyone,
in one of our last articles we showed how easy OpenHABian can be installed and how the smart pool control is integrated into OpenHab, due to the many requests I would like to go into the configuration and functionality of the smart home server with you today: We will install a binding, search for Things, create an item and display the content via HabPanel without having to write a single line of program code.
The goal is to prepare everything to integrate an ESP with ESP-Easy via MQTT into our smart home in a follow-up article.
We have installed OpenHAB here. Directly after that the web interface is already accessible:

If you have never used or seen OpenHAB before, it is helpful to use "Demo", in which some examples are already pre-installed. We choose "Standard" and start with an empty system.
You can always help yourself from the demo data here via GitHub.
Directly afterwards we are asked for the GPS position, this is important for the function of several bindings. However, we can still change this afterwards.

After a short time OpenHab has adopted the settings we specified and also shows several buttons after refreshing the page:

At this point I would like to point out that the available documentation of the developers is quite complete and many tutorials for setting up OpenHAB are also available in German, which is why we do not fully configure OpenHAB at this point and do not go into all installed bindings.
There are several ways to install additional packages. For each one we need access to the command line: Open the "Powershell" "CMD" or Putty and connect to OpenHABian with via SSH. You can find the IP address in your router, in our test network the login looks like this: "ssh openhabian@192.168.168.168" Afterwards we see:

We follow the header's advice and start with "Sudo Openhabian-Config"

Ich empfehle hier dringend die Software über "30|System Settings" zuerst zu konfigurieren und anschließend zu aktualisieren. Passen Sie die Menüpunkte auf Ihre Bedürfnisse an (Passwort!), evtl. ist der ein oder andere Neustart erforderlich. Ein Update/Upgrade ist ebenfalls empfehlenswert.
Unter "20|Optional Components" können wir Zusatzsoftware installieren:

We need Mosquitto because our smart home needs a broker for MQTT, and are asked for a password afterwards:

For more advanced users I would like to suggest the use of a password, but beginners should not use this option as it is problematic in some respects. After the configuration with openhab-config a reboot is mandatory.
Back to the web interface: Open the PaperUI

As we can see, the inbox is still empty, since we have not yet installed any extensions (binding).
OpenHab distinguishes between physical and virtual objects and calls them Things and Items. Things have channels, items have values. Here is an example:
An ESP with BME280 is a Thing. The Thing has channels like temperature or humidity. These channels can be linked to items. An item receives its value via the channel. The item is the virtual counterpart to the thing and represents the "packaging" or the framework for the values. Items can also be thought of as functions. For beginners, this may be a bit confusing.

Things can be found by OpenHAB with the correct binding in the Inbox (above in the screenshot). Items you have to define yourself if you don't use the Simple mode. We will explain this later with examples.
First, adjust the setting so that the channels are automatically linked, activate Simple mode for this.
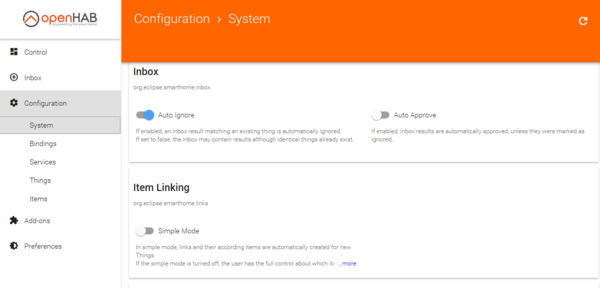
Don't forget to click "Save" at the bottom of the page to apply the settings.
So we start with the installation of Bindings to find the first Things in our Smart-Home with Auto-Discovery.
Under "Add-ons -> Bindings" you will find a large selection of plugins that we can load:

Popular examples are the Astro binding, NTP binding or the network binding. For a later use of MQTT you should also install the corresponding binding. As a simple example I show the NTP binding today. After the installation, the entry (Thing) already appears in the inbox.

Many readers will now ask where the hardware for the Thing is located because Things are actually physical objects. Well, that is correct as far as it goes. However, it is also possible to use web services or similar. I have deliberately skipped this in the explanation above, so as not to cause any more confusion.
In the inbox, add the found Thing (Local Time) to OpenHab by clicking on the blue button

And afterwards select "Add as Thing". This binding will only work correctly if you have specified the GPS position of your system. We now find the Thing under "Control"

You can configure the Thing by clicking on the small icon in the upper right corner. You will then see the two channels of the Thing and have the possibility to change the NTP server in the blue button above.
Because the Simple-Mode was used an item was created automatically. In most tutorials on the net the items are created manually. Manually created items are preferred by most users. But for this you have to create the files and items manually. Automatically created items are not located in /etc/openhab2/items as stated in the documentation but are stored in a JsonDB. The path of the database is /var/lib/openhab2/jsondb

In short, we now have a Thing with two Channels and linked Items.
The actual (and manual) way of configuring OpenHab would be: installing the bindings, defining the Things with channels, creating the Items and then creating the Sitemaps.
Since a manual creation of the Things, Items and Sidemaps requires some programming effort, a "Home Builder" is now supplied with the help of which the framework for the smart home can be created relatively comfortable. You can find it in the web interface:
We will show you how to use it to manually create items and a site map in a subsequent article.
To display the value of the item without programming knowledge we use HABPANEL today. Clicking on the panel starts a small wizard, I have created screenshots here:


We need a new dashboard

For your smart home, simply name the dashboard accordingly

It should be mentioned that the configuration is normally only saved locally on your computer. If you want to use the panel on multiple devices, it makes sense to store this under "Panel settings" on the right side.
When you reload the page, you will only find the empty dashboard:
Click the dashboard to get to this page:

If you move your mouse pointer on the field with the name at the top right, a small symbol (pen) appears. Now we can add widgets:

We choose Clock to automatically generate a clock and Dummy to explain the principle behind the items:

You can configure the widget via the three points at the top right. There are not many options for the NTP widget:

However, the other way around with the dummy:

In the dropdown menu "openHAB Item" you will find all created items, no matter if it was created in the database or in the *.items file (i.e. manually). After a final save we select back in the dashboard "Run" to display the new widgets:

The values are updated automatically, but the time in the dummy widget is updated only every 60 seconds. This is due to the fact that in Thing NTP the time is queried only every minute:

This brings us to the end of today's article. Since OpenHAB covers a huge range of topics, we will deal with individual points in subsequent articles. In the next article on this topic, we will measure a temperature with ESP-Easy, transfer the value via MQTT and display the result in the BasicUI and HABPanel.
To the next post :)


