This Contribution is also a PDF document available.
It is certainly not a big screen, but the display, built up from several matrix elements with 8x8 LEDs, can still be read from five meters away. I have cascaded modules with four single displays each and provided it with a micropython module for control. The Matrix Matrix8x8.py module has inherited elementary methods from the Framebuffer class. These include pixels, lines, rectangles and text edition. In addition, Matrix also provides complex methods such as moving, rolling and flashing. Of course, the display can be extended as desired from a single element to cascades from several groups of four. The display is controlled via a reduced SPI bus. The Miso line has no function and is therefore saved. Aroused interest? Then welcome to a new episode of
Micropython on the ESP32 and ESP8266
today
The Mammut matrix display under Micropython

Before we start creating the Matrix class, some information about the LED module used and its driver chip Max7219, this makes it easier to understand.
The Mäxe and the Framebuffer
The MAX7219 is naturally a hardware driver for 7-segment displays with 8 digits. This means that it can control 8 segments, including decimal point, for 8 display units (digits). The whole thing is multiple. Therefore, 8 + 8 = 16 lines are sufficient for 64 LEDs. The bottom line is that it does not matter whether 8 segments or 8 individual LEDs in one line are placed on +VCC at the moment when the cathodes merged by all 8 segments go on GND. If you see it exactly, the Max7219, which sits under every single matrix display, was misused. Instead of 8 pieces of 7 segments, we only get a digit with 8 lines and 8 columns. For this purpose, our Digit, apart from digits and a handful of characters, as with a 7-segment display, can also display all major and small letters of the English alphabet and even graphic elements such as lines, pixels and rectangles as well as any pattern.

Image 1: The display driver MAX7219
The properties in question are through the micropython internal module framebuf with the class Frame buffer made available. The name of this class is a program, because so that all of this can work, we need a reception memory for the pixel patterns of the display. This memory is in our class MATRIX in form of Bytearar with the name buffer made available. The individual commands fill the buffer bit by bit until we finally send it to the Mäxe of the display as a whole. Figure 2 shows the connection for four cascaded individual matrix blocks.

Image 2: Matrix display and frame buffer
In addition to some other registers, each Max7219 has 8 line register with the addresses from 0x01 to 0x08. A 1 in a BIT can light up the corresponding LED on the display.
In the ESP32 or ESP8266 I set up the frame buffer as an array, i.e. as a result of individually addressable bytes. Each line register in one of the chips corresponds to a byte in the frame buffer. The assignment is organized in such a way that the first 4 bytes from the buffer of the first line in the 4 blocks correspond. The four bytes are sent one after the other to the Max7219 from Block 3 via the SPI bus. After this chip received the byte, which is actually intended for block 0, we send him a second byte, which is intended for Block 1. While Block 3 receives this, he continues the previously preserved to Block 2. When Block 3 finally received the byte that was intended for himself, the byte sent first has also arrived in block 0 for block 0, because each driver chip passes on if it receives one. All chips are due to the same clock line and the same release management. Each of the 8 lines of the display is transmitted according to the same scheme. If we had 8 blocks, we would need 8 bytes for the content of the first complete line of the display in the Framebuffer and 8 broadcasts to push through.
The clock speed on the SPI bus is nominally 10MHz. I did not measure how quickly the clocking is. In any case, it is fast enough to ensure flowing operation.
Hardware
|
1 |
D1 Mini Nodemcu with ESP8266-12F WLAN module |
|
upon need |
|
|
1 |
|
|
1 |
|
|
various |
|
|
1 |
Breadboard kit - 3 x 65stk. Jumper Wire Kabel M2M and 3 x mini Breadboard 400 pins |
The hardware is manageable. For the controller, ESP32 or ESP8266, several blocks of matrix ads in the 8x8 pixel format are required. The width of the entire advertisement, i.e. the number of elements, is based on your needs and is freely scalable.
To accumulate, I provided the four groups with short strands and a 5-pin socket strip. It fits exactly between the display and max7219. As a result, the coupled blocks seamlessly connect.
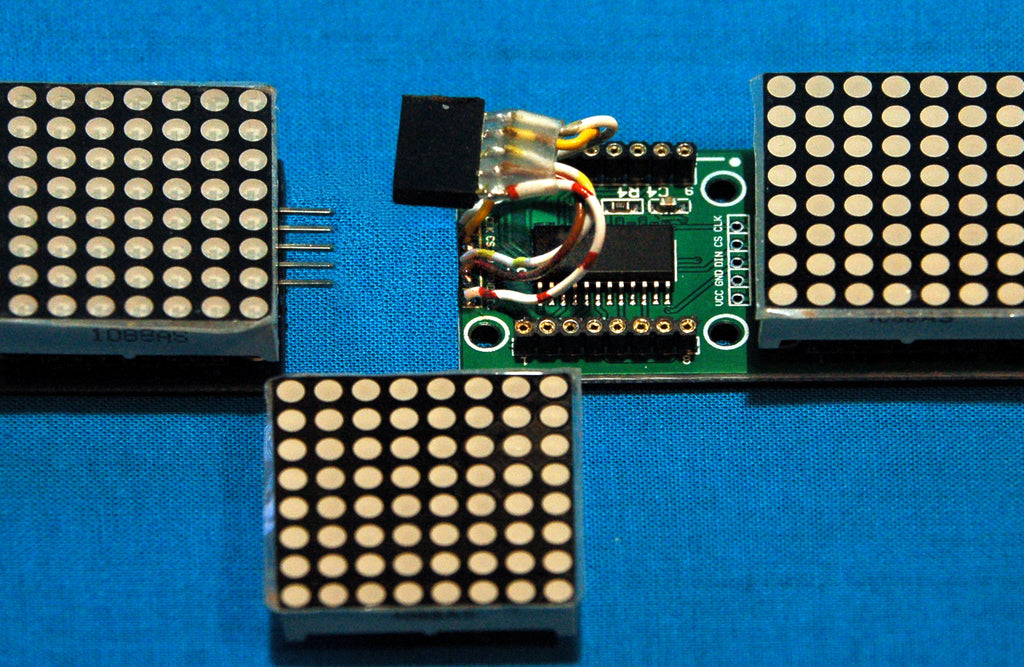

Image 4: coupled
The circuit is very clear. Only one element is entered from the display. It can easily be expanded to include one or more groups of 4, as shown in Images 3 and 4.

Image 5: Mammut matrix circuit
A voltage supply with sufficient current reserves should be used as a 5V supply for several 8x8 elements. I use a module with a step-down converter that can deliver up to 2a (3a briefly). With variable input voltage of 5 to approx. 20V, the output is set to 5V with the trim pot.

Image 6: Voltage supply with Buck converter on my carrier board
I designed a base board, with a pipe socket at the entrance and USB-A socket at the output. The whole thing is mounted on a plexiglass base plate.
The software
For flashing and the programming of the ESP32:
Thonny or
Used firmware for the ESP8266/ESP32:
Please choose a stable version
ESP8266 with 1MB Version 1.18 Status: 25.03.2022 or
ESP32 with 4MB Version 1.18 Stand 25.03.2022
The micropython programs for the project:
matrix8x8.py Driver module for the max7219
matrixtest.py Demo program for an x times 8 matrix display
Other software:
Packet transmitter Download page
Packet transmitter Windows Install version
Packet transmitter Windows Portable
Packet transmitter Linux
Micropython - Language - Modules and Programs
To install Thonny you will find one here detailed instructions (English version). There is also a description of how that Micropython firmware (As of 05.02.2022) on the ESP chip burned becomes.
The mammoth matrix module
I have already explained the way the MAX7219 works. So we can start programming the driver module immediately.
The program matrix8x8.py Is made available free of charge under the license and, in addition to the interface for hardware, offers some features that make the application much easier.
The import of modules is as manageable as the hardware. The module is essential framebuf, of which the class specifically us Frame buffer Interested. We import from the module for time control time The methods sleep and sleep_ms. We take a look at what Framebuf has to offer us.
>>> import framebuf
>>> framebuf
<modules 'Framebuf'>
>>> to you(framebuf)
['__Class__', '__Surname__', 'Framebuffer', 'Framebuffer1', 'Gs2_hmsb', 'Gs4_hmsb', 'GS8', 'Mono_hlsb', 'Mono_hmsb', 'Mono_vlsb', 'Mvlsb', 'RGB565']
>>>
In addition to the Framebuffer class, the constant is Mono_hlsb important. It ensures that in our horizontal Oriented display of the LSB, i.e. the lowest bit, ends up in the frame buffer in the LSB of the line register of the Max7219. Mono_hmsb would display the characters in the correct position on the display. It is an interesting undertaking to find out what you can do with it.
The declarations for the registers of the Max7219 follow. The information can be found in the data sheet of Maxim integrated.
We have already arrived in the definition of the Matrix class. I decided to inherit the Framebuffer class. Therefore, her name is in the round brackets behind Matrix. This is practical and in this case harmless because none of the methods I defined will have the same name as a method of Framebuffer. This also means that none of these methods are overwritten. And it is practical because I can call up every method of frame buffers as if it were defined in Matrix. Both Scopes So are merged.
class MATRIX(framebuf.Frame buffer):

    def __init__(self, spi, Cspin, Quantity=4):
        self.spi = spi
        self.CS = Cspin
        self.buffer=bytearar(Quantity*8)
        self.buf=bytearar(2)
        self.Quantity=Quantity
        great().__init__(self.buffer, self.Quantity*8, 8,\
                         framebuf.Mono_vlsb)
        self.init display()
        self.blank=(0,0,0,0,0,0,0,0)
The function - forgiveness, in a class hot functions - methods - i.e. the method __init __ () is the constructor of the class. It is used to create an object from it according to the blueprint of the class. The constructor is later called on the name of the class.
The parameter self is a reference to a created object. We hand over the SPI object that must be created in the calling program, the GPIO pin object for the chip selection and the number of matrix elements.
Then the constructor generates the object -specific objects and variables, including the frame buffer and a bytearar of length 2, which is required for communication with the max7219 across methods. The number of display elements is also set for the corresponding object.
Now follows the initialization of the Framebuffer class, from which we inherited. I give a reference to the array buffer, The number of matrix elements, whose height in Pixel and the information on the organization of Framebuffer-byte to Max7219 register.
The call of the method init display() puts all the mäxe involved in the starting position. Finally, I create a tufa blank, which serves to get all LEDs in a block for expiry when the method shape() accessed.
Next we need a routine init display() that initializes the display. The configuration registers of all Mäxe must be supplied with the start values. The method prepares the data record init display() before, and the method WriteCommand() sends the message to all integrated Mäxe. The display area is deleted and the deletion using show() visible.
    def init display(self):
        for CMD,vala in (
            (Shut down,0x00), # Display off
            (Decodemode, Node code),
            (Intensity, 0x08),
            (Display test, 0x00),
            (Scan limit, 0x07),
            (Shut down,0x01), # Display on
            ):
            self.WriteCommand(CMD,vala)
            self.fill(0)
            self.show()
In this method definition the command dives WriteCommand on. This method is one of the three basic functions that deals with direct communication with the Mäxen. In addition we come right away. The initialization is completed by deleting the display. The method fill From the Framebuffer class, simply sets all bytes in the "screen memory" to 0. In order to be visible on the display, the buffer must be sent to the Mäxe, which makes the method show().
The method WriteCommand() takes the two parameters CMD and vala. CMD Is a register address in the max7219 and vala The value that is to be written and to all Mäxe. The register address can also be seen as a command code. The STATDOWN = 0x0c tab serves to switch on or switch on all LEDs of an element.
    def WriteCommand(self,CMD,vala):
        self.buf[0]=CMD
        self.buf[1]=vala
        self.CS(0)
        for unit in range(self.Quantity):
            self.spi.write(self.buf)
        self.CS(1)
The parameters are handed over as an integer values. spi.write () But wants an object based on the buffer protocol. We have already created a buffer object with two elements in the constructor. As an instance object, we can use it in any method, keyword: recycling. We now simply assign the references to the elements to the parameters and thus have the required bytes object. We place the chipelect line to 0, and the for loop now pushes the 16 bits ahead with the MSB through all the Mäxe to the left wing. Each chip has received the same command with it self.cs (1) is taken over.
The method write() sends the content of the bytearar buffer. buffer Of course, should have the length that is twice of the number of matrix elements so that every target goal is really hit. Two bytes must be sent for each command, command and the register content.
    def write(self, buffer):
        self.CS(0)
        self.spi.write(buffer)
        self.CS(1)
Different than with WriteCommand() can with write() Different commands are sent to several Mäxe. For example, the following array would put the first and the last element of an 8-series series on the brightness level 3 and hide the elements 3 and 4.
>>> D.text("12345678",0,0)
>>> D.show()
>>> B=bytearar(b '\ n \ x03 \ x00 \ x00 \ x0c \ x00 \ x0c \ x00 \ x00 \ x00 \ n \ x03')
>>> D.write(B)
>>>
The zero-by-folder \ x00 \ x00 represents the NOOP command, which does not change the elements 1, 2, 5 and 6. The NOOPs are necessary as a filler because the MAX7219 has no way to target elements, as is happening in neopixel displays.
writer() is the third method with direct effect. It takes the number of the unit, a command and a value as an integer. After generating the zero-by-tarray of the length 2 times number of matrix elements, the unit addressed area with the command code and the value. Then the bytes of the array go on the trip.
    def writer(self, unit, CMD, vala):
        BUF_= bytearar(self.Quantity*2)
        BUF_[unit*2]=CMD
        BUF_[unit*2+1]=vala
        self.CS(0)
        self.spi.write(BUF_)
        self.CS(1)
The method _writeline() is of their importance between the low-level methods just treated and the premium methods. It serves to write the eight bytes of a pattern (shape) in the correct position of the frame buffer. The way of working is not pixel -oriented, but geared towards the elements. This actually private method is used by the method shape() which graphic patterns represent in a matrix element.
    def _writeline(self,unit,line,vala):
        self.buffer[(line * self.Quantity) + unit]=vala
When developing your own methods to control the LED matrix, the method has print buffer() proven to be very useful. After using commands that write in the Framebuffer, it can be issued. The bytes are output as 0-1 episodes with full 8 characters length.
    def print buffer(self):
        for I in range (len(self.buffer)):
            print("{: 08b}".format(self.buffer[I]))
I already count all the following methods for high society because they use the low-level commands to communicate with the Mäxen. They also do a very special task.
set() adjusts the brightness of all matrix elements to a brightness value of 0 to 15 by WriteCommand() hand over the registration number and the value.
    def set(self,vala):
        intensity=vala IF 0<=vala<=15 Else 15
        self.WriteCommand(Intensity, intensity)

    def shut down(self,state=True):
        vala=Shutdown IF state Else Normal fashion
        self.WriteCommand(Shut down,vala)
shut down() is similar to touch all elements dark (True = default) or show (False). If, as here, just about the corresponding assignment of values, I like to use Conditional Expression (conditional expressions). So goes in a line, which otherwise takes four lines.
vala=Shutdown IF state Else Normal fashion
instead of
IF state:
    vala = Shutdown
Else:
    vala = Normal fashion
How do we get signs and graphic elements in the advertisement? If you are the file matrix8x8.py Have already downloaded and looked through, you will not have found any commands. However, they are implicitly from the first line in the name room of the class MATRIX present. They all come from the inheritance of the class Frame buffer. I just put a line -up in between.
|
Fill (C) |
entire display |
Fill or delete display |
|
Fill_rect (X, Y, B, H, C) |
pixel -oriented |
Filled rectangle X, y left over corner B, H width and height |
|
Hline (X, Y, W, C) |
pixel -oriented |
Horizontal line X, y starting point (left) W width/length |
|
Line (X, Y, XB, YB, C) |
pixel -oriented |
X, y starting point, XB, YB end point |
|
Pixel (x, y, c) |
pixel -oriented |
Point coordinates |
|
Rect (X, Y, B, H, C) |
pixel -oriented |
Border X, y left over corner B, H width and height |
|
scroll (x, y) |
pixel -oriented |
Move display content With vector x, y |
|
Text (T, X, Y, C) |
pixel -oriented |
Text edition X, y left over corner |
|
VLINE (X, Y, H, C) |
pixel -oriented |
vertical line X, y starting point (above) H height |
C = 0 | 1: Dark | bright
X = 0 .. (Number of elements * 8) - 1
y = 0..7
B = 1 .. (Number of elements * 8) - X
h = 1..8-y
T text constant or string variable
In order for the objects to become visible, the frame buffer must be sent to the display. That does the method show(). It pushes line by line the corresponding bytes from the frame buffer into the registers of the display blocks. Compare Figure 2.
    def show(self):
        for line in range (8):
            self.CS(0)
            for unit in range(self.Quantity):
                self.buf[0]=Digit start+line
                self.buf[1]=self.buffer[(line * self.Quantity)\
                                        + unit]
                self.spi.write(self.buf)
            self.CS(1)
Now that you know how to fill the display with content, we look at the remaining methods of Matrix.
flashing() explains what the name promises and lets the display blink. She goes first for off Milliseconds and then for on Milliseconds. Of course, the latter is not noticeable if the display remains afterwards. With CNT Let us state how often the process is repeated. Only from cnt = 2 does the flashing notice.
def flashing(self,on,off,CNT=1):
for I in range(CNT):
self.shut down()
sleep_ms(off)
self.shut down(False)
sleep_ms(on)
def clear(self,show=True):
self.fill(0)
IF show:
self.show()
clear() Use the method fill() to fill the display with background color. Deletion becomes visible immediately if show = true is handed over. With False Let's wait until the next show(), explicitly in the program text or implicitly in a method.
shape() Requests the number of a display element and a tuble or a list with the 8 bit patterns of an 8x8 graphic to use it using the method writeline() to write in the frame buffer. show=True Brings the pattern to the display immediately.
    def shape(self,unit,buf,show=False):
        for line in range(8):
            self._writeline(unit,line,buf[line])
        IF show:
            self.show()
The following example represents a heart in display element 0. True leads to the fact that the pattern is also displayed immediately.
>>> Heart=( 0b00000000,
0B01101100,
0B11111110,
0B11111110,
0B0111100,
0B0011000,
0B00010000,
0b00000000,
)
>>> shape(0,Heart, True)
clearunite() Use the Shape method for a zero pattern that through self.blank= (0.0.0.0.0.0.0.0) in the constructor is defined to write the content in the frame buffer.
def clearunite(self,unit,show=False):
self.shape(unit,self.blank)
IF show:
self.show()
def clearft(self,from,until=None,show=False):
until_=self.Quantity
IF until is need None:
until_=self.Quantity IF until>=self.Quantity Else until
for unit in range(from, until_):
self.shape(unit,self.blank)
IF show:
self.show()
Also clearft() Use the method shape(). It deletes the matrix elements of from until until, if a value has been specified. If the assignment is missing until, is deleted to the end of the notification.
pixelhift() shifts the display of the display by pixelation around the distance spacer. The direction is through the parameter direct fixed. With delay= 50 ms the position changes are fluid.
    def pixelhift(self,spacer, direct="Left",delay=50):
        direction=direct.upper()
        to you_={
            "Left":(-1,0),
            "Right":(1,0),
            "Up":(0,-1),
            "Down":(0,-1),
            }
        X,y=to you_[direction]
        for I in range(spacer):
             self.scroll(X,y)
             sleep_ms(delay)
             self.show()
The dictionary to you Translates the plain text terms into the corresponding vectors, which the method scroll() required from the Framebuffer class. Other directions can of course be supplemented. So that the shift is effective, the value for delay are not chosen too small. Values that lead too big to Stop and Go and are useful if you want to follow exactly what happens, for example with the penultimate method roller().
    def roller(self,text, CNT=1, multiply=False, delay=50):
        L=len(text)
        text_= text IF text[L-1]==" " Else text+" "
        #print (text_)
        T=text_
        IF multiply:
            while len(T) <= (self.Quantity//4)*3:
                T+=text_
        T = T + " "*(self.Quantity)
        for W in range(CNT):
            for S in range(len(T)):
                self.clearunite(self.Quantity-1)
                self.text(T[S],(self.Quantity-1) * 8,0,1)
                self.pixelhift(8,"Left",delay)
The method rolls texts via the display. You will be in text hand over. With CNT Let us state how often the process should be repeated. Texts that are shorter than three quarters of the advertising length can be done multiply= True can be multiplied. The parameter delay We already know from Pixelhift() where it is also used here.
So that the text rolls clean and does not pull a comet tail behind it, at least the last pixel column must be on the right. Some characters are 8 pixels wide. Exactly that would cause problems. We therefore examine whether the text ends with a spaces. If he doesn't, we add one. We do this again with a conditional expression. In the next step, the text will add up with itself, if necessary, until it is at least three quarters as long as the display has elements.
Now we let the story roles as many rounds as CNT specifies. The right-wing position is deleted, then we add the S-TE sign from the text right there and push the entire display by 8 positions to the left.
I still have a gadget, the method center() that does exactly what the name promises - if that is possible. Texts that are shorter than the advertising width are centered. Longer texts are rolled out of the display.
    def center(self,text):
        pix=self.Quantity*8
        center=pix//2
        L=len(text)
        IF L > self.Quantity:
            self.roller(text, velocity=100)
        Else:
            startpos=center-(L*8)//2
            self.text(text,startpos,0,1)
            self.show()
The test program
Of course, you are already burning to try the new class. This can be done by hand about Thonny's terminal, but it can be much nicer the program matrixtest.py. Download it right away, open it in an editor window and start it there with F5. Then lean back, knock on the shoulder and enjoy the demo.
Outlook
If there is now no projects for the application of the Matrix class, I can announce a thermal hygrometer with the SHT21 with the next blog post from this series. This module is controlled via the I2C bus. Together with the Mammut matrix, this results in a surveillance device that can also be easily read from a greater distance. Maybe you have a greenhouse whose climate you want to monitor from the window? Then that's exactly the right thing for this purpose.
Until then!


3 comments
Dankward
Funktioniert auch mit dem Raspberry pi pico. Ich habe die Datei matrixtest.py entsprechend verändert:
elif chip == ‘rp2’:
bus = 0
MISOp= Pin(16)
MOSIp= Pin(19)
SCKp = Pin(18)
spi=SPI #rp2
CSp = Pin(17, mode=Pin.OUT, value=1)
Eingefügt zwischen den Part von dem ESP32 und dem else – Block
Jürgen
Hallo, Andreas,
um sicher zu gehen, hab ich nicht meine Programme, sondern die vom Server genommen, aber ich habe keine Fehlermeldung bekommen, lief alles normal sowohl auf einem D1 mini und auch auf einem Dev Kit C V4.
In deiner Rückmeldung lese ich keinen Dateinamen, normal steht da .. in . Aufgrund der Meldung vermute ich einen Tippfehler bei irgendeinem der Parameter, spi oder CSp, beides sind Positionsparameter und zwingend nötig beim Konstruktoraufruf. Die anderen Parameter sind self und der optionale Parameter anzahl mit Defaultwert 4. Wenn du vier Anzeigen hast musst du da keinen Wert übergeben.
Andreas
Hallo, ich kriege leider immer den Fehler:
Hardware-Bus 1: Pins fest vorgegeben
MISO Pin(15), MOSI Pin(13), SCK Pin(14), CSPin(4)
Traceback (most recent call last):
File “”, line 38, in
TypeError: function missing 1 required positional arguments
Ich habe das modul nicht verändert, da bereits anzahl=4 richtig übergeben wird. Weiß einer Rat?