This article is also available as a PDF document .
The HTU21 can measure temperature and humidity. For the air pressure, for example, we would also need a BMP280, or a BME280 for everything together. Of course, this raises the question of what the correct term should be: Let me measure or let me be measured? In this case, both are wrong, because today it is correct to say: let others measure.
These "others" operate a website with the URL openweathermap.org. From there you can get weather data from all over the world. The only requirement is a free registration. Then you get a 32-character key. This is used to feed the queries, which must also contain the location, the country code and the language. How this all works and what role the mammoth matrix display plays in this, you will learn in this blog post from the series
MicroPython on the ESP32 and ESP8266
today
The mammoth matrix display as weather ticker
You can find out more about the Mammut-Matrix-Display itself and the associated controller in the first part of this series. There you will find the schematic and a description of how the display works. Furthermore a MicroPython module for controlling the display was developed, which can and will be used in further projects, for example here.
In the second part was about the temperature and humidity sensor HTU21 alias SHT21. For its control also a MicroPython module was built. In addition, you will learn more about the operation of the I2C bus and it is shown how to make the bus signals visible with inexpensive means. The used 8-channel Logicanalyzer is perfectly suitable for this. Furthermore there is information about the CRC checksum calculation.
The radio transmission of the data to the display was the subject of the third part. The connection was made via WLAN, either via the access point of the router, or via the access point of the ESP32, which also controls the display. In addition, you can read here how to clone pixel character sets from Windows TTF character sets for OLED displays and of course also for mammoth matrix displays.
As for hardware, I only use an ESP32(S) and the matrix display in this episode. Of course, an HTU21 can also provide the in-house climate data in addition.
The texts to be displayed are all much longer than 16 characters, therefore the method roll() is used. The display should consist of at least 8 to 12 elements because of readability.

Weather ticker - 182 x 8 - matrix
Hardware
|
1 |
|
|
according to demand |
|
|
1 |
|
|
various |
|
|
1 |
Breadboard Kit - 3 x 65pcs Jumper Wire Cable M2M and 3 x Mini Breadboard 400 Pins |
|
1 |
Plywood strips 5x 25cm ... for display mounting |
The circuit is very simple and therefore well suited for beginners. The schematic shows an optional HTU21 alias SHT21. You will learn everything you need to know about its usage in the 2nd part .

Illustration 1: SHT21-Thermo+Hydrometer with ESP32
As 5V supply for several 8x8 elements a power supply with sufficient current reserves should be used. For this I use a module with step-down converter, which can supply up to 2A (3A for a short time). With variable input voltage from 6 to about 20V the output is set to 5V with the trim pot.

Illustration 2: Power supply with buck converter on my carrier board.
For the development of projects I designed a base board for this purpose, provided it with a tube socket at the input and a USB-A socket at the output and mounted the whole thing on a plexiglass base plate.
An account at Open Weather
For an account at Open Weather go to their website How to Start.

Illustration 3: How to start
Click on here (red arrow) and enter your data in the form below.

Illustration 4: Create new account
Declare that you are not a robot and submit the registration.

Illustration 5: Create account
You want to know what you want to use Open Weather for. If you do not want to commit, select other. To finish click Save.
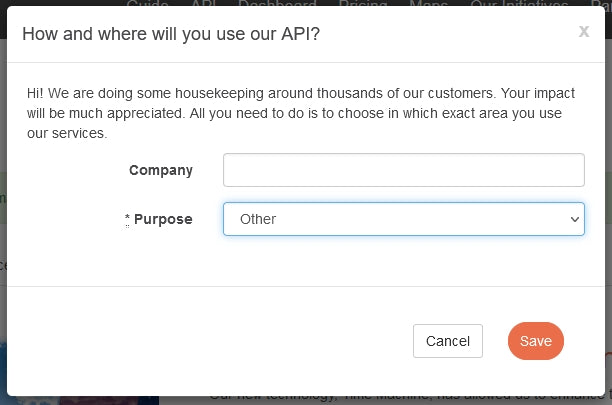
Illustration 6: How to use
After that there is a welcome message. stormy@gmx.de is a fake address. Requests to this mail account will certainly not be answered. If you want to acknowledge the confirmation link, you should of course have entered your mail address.

Illustration 7: Confirmation mail
A click on API keys will show you your APPID. Copy it to a safe place and have the code ready, we will need it shortly.

Illustration 8: Copy and save API key
The software
For flashing and programming the ESP32:
Thonny or
Used firmware for the ESP32:
Please choose a stable version
ESP32 with 4MB Version 1.18 Status 03/25/2022
The MicroPython programs for the project:
matrix8x8.py Driver module for the MAX7219
possibly sht21.py Driver module for the GY-21 module
Possibly shtdisplay.py Thermo- Hygrometer Software with Writer
possibly shtdisplay+.py Thermo- Hygrometer Software with Writer
writer.py The driver for the display with the new character sets.
ocr8.py narrow character set
openweathermap.py Service software for the blog
Other software:
Browser
MicroPython - Language - Modules and programs
For the installation of Thonny you will find here a detailed manual (english version). There is also a description in it, how the MicropythonFirmware (as of 02/05/2022) on the ESP chip is burned .
MicroPython is an interpreter language. The main difference to the Arduino IDE, where you always and only flash whole programs, is that you only need to flash the MicroPython firmware once at the beginning to the ESP32, so that the controller understands MicroPython instructions. You can use Thonny, µPyCraft or esptool.py to do this. For Thonny, I have described the process here .
Once the firmware is flashed, you can casually talk to your controller one-on-one, test individual commands, and immediately see the response without having to compile and transfer an entire program first. In fact, that's what bothers me about the Arduino IDE. You simply save an enormous amount of time if you can do simple tests of the syntax and the hardware up to trying out and refining functions and whole program parts via the command line in advance before you knit a program out of it. For this purpose I also like to create small test programs from time to time. As a kind of macro they summarize recurring commands. From such program fragments sometimes whole applications are developed.
Autostart
If you want the program to start autonomously when the controller is switched on, copy the program text into a newly created blank file. Save this file as boot.py in the workspace and upload it to the ESP chip. The program will start automatically at the next reset or power-on.
Test programs
Manually, programs are started from the current editor window in the Thonny IDE via the F5 key. This is quicker than clicking on the Start button, or via the menu Run. Only the modules used in the program must be in the flash of the ESP32.
In between times Arduino IDE again?
If you want to use the controller together with the Arduino IDE again later, simply flash the program in the usual way. However, the ESP32/ESP8266 will then have forgotten that it ever spoke MicroPython. Conversely, any Espressif chip that contains a compiled program from the Arduino IDE or the AT firmware or LUA or ... can easily be flashed with the MicroPython firmware. The process is always like here described.
The connection to Open Weather
Before we start with the program, let's test the connection to Open Weather. Do you have your APPID handy? Yes, then please start a browser, if not already running, and enter the following URL. Before sending the request, you have to replace the xxxxx.. with your APPID.
http://api.openweathermap.org/data/2.5/weather?q=Berlin,DE&APPID=xxxxxxxxxxxxxxxxxxxxxxxxxxxxxxxx&lang=de
And off you go. The result should look something like this if you have selected the JSON tab.

Illustration 9: Weather Berlin
If you click on raw data it looks like this.

Illustration 10: Raw data
{"coord":{"lon":13.4105,"lat":52.5244},"weather":[{"id":800,"main":"Clear","description":"Klarer Himmel","icon":"01d"}],"base":"stations","main":{"temp":282.9,"feels_like":279.19,"temp_min":281.62,"temp_max":284.36,"pressure":972,"humidity":78},"visibility":10000,"wind":{"speed":9.26,"deg":240},"clouds":{"all":0},"dt":1649350813,"sys":{"type":2,"id":2011538,"country":"DE","sunrise":1649305619,"sunset":1649353781},"timezone":7200,"id":2950159,"name":"Berlin","cod":200}
What you have in front of you is JSON-code. JSON is the acronym for JavaScript Object Notation. In addition to plain text in the form of strings and numbers, the text contains a number of symbols such as { }, [ ], :, " " and commas. Strings are enclosed in double quotation marks, as in MicroPython. Data are specified as pairs with a name and a value separated by a colon, as in a dict in MicroPython. Curly braces indicate Dict objects and square brackets define lists.
We now use the clear JSON notation in the browser to prepare the data from Open Weather's response for our display. By the way, more information about the individual fields can be found at this URL:
https://openweathermap.org/current
We start in the program with various imports. Program lines, which refer to the HTU21 I comment out. Import lines, which refer specifically to the project, I have formatted bold.
# openweathermap.py
import os,sys # System and file instructions
from machine import Pin,SoftI2C, SPI
from time import sleep, sleep_ms, ticks_ms
#from sht21 import SHT21
from matrix8x8 import MATRIX
import ocr8 as charset
from writer import Writer
#from i2cbus import I2CBus
import esp
esp.osdebug(None)
import gc
gc.collect()
Imports for network connection and working with server connections follow.
import network
import socket
try:
  import urequests as requests
except:
  import requests
try:
  import ujson as json
except:
  import json
The class network contains the methods for connecting to the local network, socket provides methods for the TCP connection to the Open Weather Server. With requests we establish the connection and receive the response. json provides methods for conveniently parsing the response, as we saw above. Without this module, we would have to write our own parser, which would be far more costly.
The following four lines are self-explanatory. Of course you have to enter your own credentials here and adapt the IP address for the ESP32 to your network infrastructure.
mySSID = "Here goes your SSID"
myPass = 'Here goes your password'
myIP="10.0.1.96" # our STA-IP
myPort=9009 # our port number
I explain the flash button of the ESP32 module as an emergency brake. I use it, if nothing else helps to get out of the mainloop, especially if the program in the production system is called as boot.py runs autonomously. How this works with autostart is explained in the Software chapter.
key=Pin(0,Pin.IN,Pin.PULL_UP)
city = 'Nuremberg'
country_code = 'DE'
api_key = 'xxxxxxxxxxxxxxxxxxxxxxxx'
wr=["N","NNO","NO","ONO",
"O","OSO","SO","SSO",
"S","SSW","SW","WSW",
"W","WNW","NW","NNW",
]
messDelay=5*60*1000 # 5 minutes
We define a location name, a country code and set the APPID. For the x-e please put again your APPID. The list of wind directions helps us to output the direction instead of degrees, using the direction acronyms. And it is enough if we start a query to the server every 5 minutes.
Then we determine the type of the used controller and after that we set the GPIO pins for the SPI bus, which we need for output to the display.
chip=sys.platform
if chip == 'esp8266':
    # pin translator for ESP8266 boards
    # LUA pins D0 D1 D2 D3 D4 D5 D6 D7 D8
    # ESP8266 pins 16 5 4 0 2 14 12 13 15
    # SC SD
    bus = 1
    MISOp = Pin(12)
    MOSIp = Pin(13)
    SCKp  = Pin(14)
    spi=SPI(1,baud rate=4000000)   #ESP8266
    # # alternatively virtual with bitbanging
    # spi=SPI(-1,baudrate=4000000,sck=SCK,mosi=MOSI,\
    # miso=MISO,polarity=0,phase=0) #ESP8266
    CSp = Pin(16, mode=Pin.OUT, value=1)
# SCL=Pin(5) # S01: 0
# SDA=Pin(4) # S01: 2
# i2c=SoftI2C(SCL,SDA)
elif chip == 'esp32':
    bus = 1
    MISOp= Pin(15)
    MOSIp= Pin(13)
    SCKp = Pin(14)
    spi=SPI(1,baud rate=10000000,sck=Pin(14),mosi=Pin(13),\
            miso=Pin(15),polarity=0,phase=0)  # ESP32
    CSp = Pin(4, mode=Pin.OUT, value=1)
# SCL=Pin(21)
# SDA=Pin(22)
# i2c=SoftI2C(SCL,SDA)
else:
    raise OSError ("Unknown port")
numOfDisplays=16
d=MATRIX(spi,CSp,numOfDisplays)
d.setIntensity(7)
w = Writer(d, charset)
I tell the program that I am using 16 display elements and with the SPI bus object, the GPIO pin for the chip select line and the number of units I instantiate the mammoth matrix display object d. The Writer object w is used to display your own character sets. How these are derived from Windows character sets and used is described in part 3 of this series.
We define two functions. hexMac() takes the byte sequence from nic.config('mac') and makes it a normal string for the return. This information is needed to enable access for our client station in the router. Please consult the manual of your WLAN router for this setting.
def hexMac(byteMac):
    macString =""
    for i in range(0,len(byteMac)):
        macString += hex(byteMac[i])[2:]
        if i <len(byteMac)-1 :
            macString +="-"
    return macString+" "
TimeOut() is a function that defines another function in its function body. This function compare() uses the value of the pass parameter t and the variable startwhich is declared outside compare() but used inside the function. TimeOut() returns a reference to compare(), not a value. compare() is a so-called closure and this has the advantage that variables keep their value between the calls to compare(), while local variables are normally killed when the function exits. I like to use the closure as a non-blocking software timer.
def TimeOut(t):
    start=ticks_ms()
    def compare():
        return int(ticks_ms()-start) >= t
    return compare
The connectStatus dictionary allows the output of the WLAN connection status in plain text.
connectStatus = {
    0: "STAT_IDLE",
    1: "STAT_CONNECTING",
    5: "STAT_GOT_IP",
    2:  "STAT_WRONG_PASSWORD",
    3:  "NO AP FOUND",
    4:  "STAT_CONNECT_FAIL",
    1000: "STAT_IDLE",
    1001: "STAT_CONNECTING",
    1010: "STAT_GOT_IP",
    202:  "STAT_WRONG_PASSWORD",
    201:  "NO AP FOUND",
    5:    "GOT_IP"
    }
The AP interface is not needed, so we turn it off as a precaution before it gets into mischief. This happens from time to time.
nac=network.WLAN(network.AP_IF)
nac.active(False)
nac=None
The Station Interface is instantiated and disabled first. Then we get the MAC and output it.
nic = network.WLAN(network.STA_IF)
nic.active(False)
MAC = nic.config('mac')
myID=hexMac(MAC)
print("Client ID",myID)
Now the STA interface is activated, we set a static IP address. This simultaneously disables the DHCP client, which would obtain the IP address from the WLAN router. For a client, a static IP is not absolutely necessary, but it makes troubleshooting easier if something is not running as desired.
Further up you have your Credentials are specified with which a connection to the router is now to be established.
# We activate the network interface
nic.active(True)
# Establish the connection
# We set a static IP address
nic.ifconfig(("10.0.1.96","255.255.255.0","10.0.1.20","10.0.1.100"))
# Log on to the WLAN router
nic.connect(mySSID, myPass)
Normally there is no connection to the access point yet. But we are cautious people and therefore we query the state first after the run index n has been initialized with 1.
n=1
if not nic.isconnected():
    # wait until the connection to the access point is established
    while not nic.isconnected():
        print("{}.".format(nic.status()),end='')
        d.text("."*n,0,0,1)
        d.show()
        n+=1
        sleep(1)
So normally we end up in the while-loop, which is run until the connection is established. As long as this is not the case, one more point is sent to the display every second. Usually 2 to 3 points are used. If there are more than ten dots, you can assume that there is a problem. The connection status is displayed as a number in the terminal. The Dict connectStatus tells you the cause.
You can also use the run index to abort the contact attempt to this router after a certain time and either display the error message in plain text, or try to connect to an alternative access point.
n=1
if not nic.isconnected() and n<=10:
    # wait until the connection to the access point is established
    while not nic.isconnected():
        print("{}.".format(nic.status()),end='')
        d.text("."*n,0,0,1)
        d.show()
        n+=1
        sleep(1)
I follow the first approach.
print("\nConnectionStatus: ",connectStatus[nic.status()])
if nic.isconnected():
    # Was the configuration successful? Control
    STAconf = nic.ifconfig()
    print("STA-IP:\t\t",STAconf[0],"\nSTA-NETMASK:\t",\
          STAconf[1],"\nSTA-GATEWAY:\t",STAconf[2] ,sep='')
else:
    print("No AP found")
Then the socket object s is instantiated. The parameters socket.SOCK_STREAM and socket.AF_INET build a TCP interface based on the IPv4 address-family. When calling the method setsockopt() method, the parameter socket.SO_REUSEADDR ensures that the same socket data, IP address and port number, can be reused after a restart without a reset without causing an error.
s = socket.socket(socket.AF_INET, socket.SOCK_STREAM)
s.setsockopt(socket.SOL_SOCKET,socket.SO_REUSEADDR,1)
s.bind(('', myPort))
print("I am on port",myPort)
s.settimeout(5)
The method bind() binds the port number in myPort to the IP address set in the WLAN part. Finally, the timeout of 5 ms ensures that the receive loop of the socket does not block the flow of the main loop. If this were the case, then for example the roll() command could not be executed in the foreground. Sending messages to the Open Weather server and receiving them from it are therefore rather secondary matters and are governed by the timer mentioned above. We will come to that in a moment.
The next three lines set the URL for the API of the Open Weather Server, send the request, get the response at the same time and start the timer for the next such event.
owmurl = 'http://api.openweathermap.org/data/2.5/weather?zip=93047'+ ',' + country_code + '&APPID=' + api_key + '&lang=en'
weather_data = requests.get(owmurl)
measure=TimeOut(measureDelay)
At this point, a note on the location specification is appropriate. In the sample code, one of the postal codes of Regensburg is used, zip=93047. Alternatively, the city name can be used for larger cities. For Nuremberg, the same place would be: q=Nuremberg. You can test this out if you use the content of owmurl in the terminal and enter the string as URL in the browser. Instead of the x-e there should be your APPID.
>>> owmurl = 'http://api.openweathermap.org/data/2.5/weather?zip=93047'+ ',' + country_code + '&APPID=' + api_key + '&lang=en'
>>> owmurl
'http://api.openweathermap.org/data/2.5/weather?zip=93047,DE&APPID=xxxxxxxxxxxxxxxxxxxxxxxxxxxxxxxx&lang=de'
>>> owmurl = 'http://api.openweathermap.org/data/2.5/weather?q=Nuremberg'+ ',' + country_code + '&APPID=' + api_key + '&lang=en'
>>> owmurl
'http://api.openweathermap.org/data/2.5/weather?zip=93047,DE&APPID=xxxxxxxxxxxxxxxxxxxxxxxxxxxxxxxx&lang=de'
Sending the request to the server and receiving its response is all very compact in this line.
weather_data = requests.get(owmurl)
requests.get() returns a reponse object containing some data fields and the method json() method, which we will use for parsing in a moment.
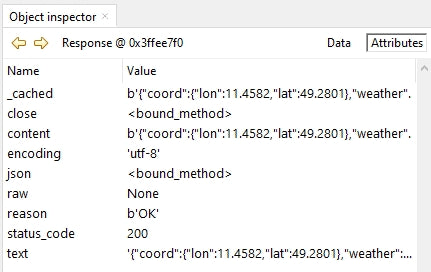
Illustration 11: Inner workings of the response object
I'm just finishing up the timer, then it's off to the main loop. measure contains a reference to the function compare() inside TimeOut(). measure can therefore be called as a function. With the call of measure() I actually call compare(). The closure compare() returns True if the timer has expired. Then we start a new request and restart the timer.
Because we are curious, we will print the text of the response object.
The order in decoding the JSON code is arbitrary and only based on the name of the pairs. Thus, the pair name: "Regensburg" is found at the very bottom of the row. weather_data.json().get('name') returns the value "Regensburg".
Some of the pairs are indented, for example at the name sys (Illustration 6). If we look at the raw text, we see that a whole dict is assigned to the name sys.
'sys': {
'country': 'DE',
'sunrise': 1649392622,
'sunset: 1649440481,
'id': 1839, 'type': 1
}
To access the country identifier DE, a staged query is required.
weather_data.json().get('sys').get('country')
The query for the weather description is particularly interesting. The name weather is assigned a list (square brackets) whose zeroth element we must address in order to access main and description.
weather_data.json().get('weather')[0].get('main')
weather_data.json().get('weather')[0].get('description')
The composite text is output at the terminal and sent to the matrix display with the command roll() command.
In the dict main contains the data for temperature, relative humidity and air pressure. These are also to be queried in two stages. The temperatures in Kelvin must be converted into Celsius values. The degree range for the Kelvin scale is the same as for Celsius, only 273.15 has to be subtracted.
    temp = weather_data.json().get('main').get('temp')-273.15
    felt = weather_data.json().get('main').get('feels_like')-273.15
    temperature = 'temperature: {:5.1f} *C felt: {:5.1f} *C'.format(temp,felt)
The format strings for the output of the temperature values are interesting. Since no names are used for formatting, the automatic assignment applies according to the order of the parameters. The output is a floating point number (f) with at least 5 characters width and one digit after the decimal point. The situation is similar for air pressure and relative humidity.
For wind, direction and speed are interesting. The speed is converted into km/h as an integer. The direction comes in degrees from 0° (north) over 90° (east), 180° (south) and 270° (west). The index into the list defined at the beginning wr is calculated on the basis of a 22.5° grid.
Furthermore, a warning for gusts (gust) of more than 40km/h is useful. This is done by a centered flashing message at the end of the while block, if the gust speed exceeds 40km/h.
    speed=int(weather_data.json().get('wind').get('speed') * 3.6 + 0.5)
    direction=int(weather_data.json().get('wind').get('deg') / 22.5 + 0.5)
    gust=int(weather_data.json().get('wind').get('gust') * 3.6 + 0.5)
    wind = 'wind from {} with {:2} km/h '.format(wr[direction], speed)
    print(wind)
    d.roll(wind)
    if gust >=40:
        w.center("PEAK: {:3} km/h".format(gust))
        d.blink(1500,500,6)
        d.pixelShift(8,"up",75)
The key query completes the while loop.
    if key.value()==0:
        d.clear()
        d.center("CANCELED")
        sys.exit()
Depending on which API is used by Open Weather, other services can be used if they are included in the Free Plan, i.e. free, no-cost access. Scroll down the page https://openweathermap.org/api follow the links, feel free to experiment a bit here. For example, this would be a request for a 7-day forecast.
https://api.openweathermap.org/data/2.5/onecall?lat=49.2801&lon=11.4582&exclude=hourly,minutely&appid= xxxxxxxxxxxxxxxxxxxxxxxx
Enter the line along with your APPID in the browser and look at the output in the JSON folder first before you get to picking apart the message. The request uses the one-call API. The location information here is in latitude and longitude. If you don't know the values for your location, just ask Google maps.

Illustration 12: Location coordinates latitude and longitude
In the list daily the days are numbered from 0 (today) to 7 (in a week). Warning messages are in the list alerts. Help pages are available for each API, describing the various parameters of the call and the fields in the response string. For the One-Call API, this is the page: https://openweathermap.org/api/one-call-api.
All requests also return different times, current time, sunrise, sunset... The Unix time stamps give the number of seconds since 01/01/1970 0:0:0,0. But the time epoch of MicroPython on the ESP32 ports starts only on 01.01.2000. To get the correct time-date-combination it needs two corrections, 946681200 has to be subtracted and during daylight saving time 3600 has to be added. Then can be calculated with time.localtime() the correct time can be output.
This could then look like this with the last specified request.
from time import localtime
...
    time=int(weather_data.json().get('current').get('dt') - 946681200 + 3600)
    dt= localtime(time)
    day=str(dt[2])+"."+ str(dt[1])+"."+ str(dt[0])
    clockTime= str(dt[3])+":"+ str(dt[4])+":"+ str(dt[5])
    d.roll(tag+" *** "+clockTime)
With this you are well equipped for all eventualities and you can use the services of Open Weather intensively. I wish you much success and pleasure!


