Welcome to today's blog post.
As my colleague has already told you, we've been having recurring problems with our phone accessibility since we moved in March.
To keep an eye on the status of the internet connection, as well as other devices on the network, there are a variety of solutions. Today I present a solution with a RaspBerry Pi, which you can also implement at home for monitoring your home network.
I choose a solution where no packages have to be installed and configured. During setup, you only need to connect to the RaspBerry Pi once via SSH, and execute the initialization with a simple command.
For this we need the following:
1x Raspberry Pi (Model 3 B+ recommended).
1x Suitable SD card with at least 16GB
1x USB card reader
NEMS -Nagios Enterprise Monitoring Server
1. Preparation
NEMS is a preconfigured Linux distribution with all necessary packages. The installation is kept as simple as possible. First we download the ISO file from the manufacturer's site:
https://nemslinux.com/
We go to "Get NEMS Linux" → "NEMS for RaspBerry Pi", and either choose the "Direct Download", or we can download the file via BitTorrent.
To write the ISO file to the SD card we use the program Etcher. We download it from https://etcher.io/ and install it.
After starting Etcher, the following window appears:
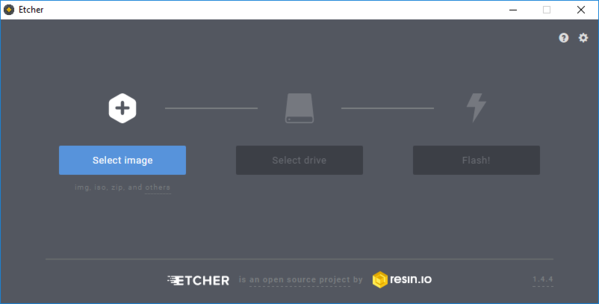
First we select our NEMS ISO file with "select image".
At "Select Drive" we now select the target drive. ATTENTION: all data on the drive will be overwritten! To make sure that you have selected the correct drive, I recommend, if possible, to click on "Select Drive" first, and only then connect the card reader. The device will then appear in the selection and we can be sure not to accidentally overwrite the wrong drive:


Now we click on "Flash", confirm the possible security dialog, and the data is written and checked on the SD card.
2. The first commissioning
I strongly recommend to use a RaspBerry Pi with Ethernet interface and will not go into the setup of the WLAN in this post. So if you want to use a RaspBerry Pi Zero, you can use a USB to Ethernet adapter.
We connect the RaspBerry Pi to a monitor via HDMI cable, insert the prepared SD memory card, and connect our Pi to power.
After an inconspicuous boot process, a display appears on which we can see the IP address that was assigned to the Raspberry Pi via DHCP.
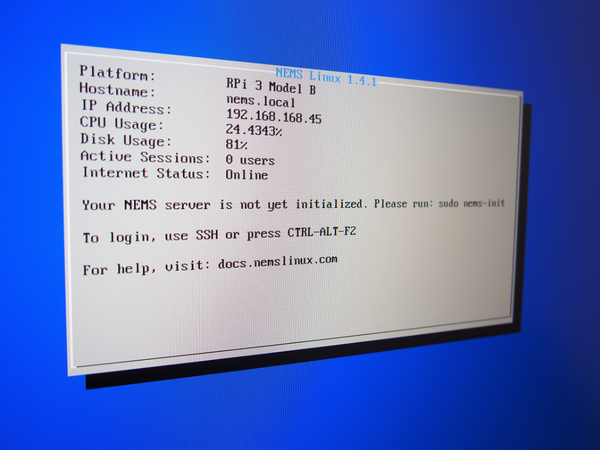
So we open a web browser and call the IP address. A message appears that our NEMS server is not initialized yet. We should please connect via SSH and execute the command "sudo nems-init".

Under Windows 10 I can now simply call the command line by pressing the Windows key and R for "run" together. A window with the title "Run" appears in which I can specify which program Windows should run. I enter "cmd" and confirm with the Enter key.

In the command line we now enter the command "ssh" followed by the user name, an @ sign, and the IP address. The username we should log in with is "nemsadmin". So we enter: "ssh nemsadmin@196.168.168.45".
Since we have not yet made an SSH connection to this system, we will be asked if we are sure we want to connect. We can confirm this by entering "yes".
Only we are asked for the password for the user "nemsadmin". This is also "nemsadmin".

We now enter the command "sudo nems-init" to start the initialization of the server and confirm this again by entering the password.
The user nemsadmin is removed during the initialization and a new user is created for us. So we have to specify a user name. I'll call the user markus, and specify a password.
Next, we need to select the time zone. In my case I choose "Europe" and then "Berlin".

Now the initialization via SSH is finished. We are prompted to restart the RaspBerry Pi by pressing any key.

Now our device reboots, and makes the necessary changes to the system. After the reboot, the system load may appear somewhat high. This can take a few minutes, and should not worry us.
A look back at the web interface shows that the initialization was successful:

First we go to "CONFIGURATION" → "NEMS System Settings Tool". Modern browsers like Firefox and Chrome will now issue a warning because we are using a self-created SSL certificate. We click on "ADVANCED" and further down on "Continue to 192.168.x.x (insecure)".

Now we register with the newly created user account.

In the NEMS System Settings tool, we should now enter a password for encrypting and decrypting backup files.
Also, on this page we can specify the access information for a Telegram chatbot, a Pushover account, or for an SMTP mail server, so that NEMS can notify us this way.
We save the changes by clicking on "Save all Settings".

Next, we look at what is currently being monitored. For this we go to the menu item "Reporting" and select "Adagios". Adagios is a somewhat more modern interface for displaying the various data from Nagios.
Here I also log in with my user markus. On the overview page we see that only one host is monitored and all hosts and all services are running.
With a click on "Hosts" we see a list of all monitored systems. Currently only our RaspBerry Pi with the name NEMS appears in the list.

This would complete the installation, and I would normally say goodbye at this point, and refer to an upcoming blog post - however, I would like to add a host to monitor, as this is not self-explanatory, and I don't want to leave you hanging at this point.
We close the Adagios tab from the browser, and find ourselves back on our main NEMS page. Now we can go to the Configuration → NEMS Configurator (NConf) menu to access the page that allows us to configure Nagios.
Again I log in with my user markus.

Welcome to the NConf main page. I can't give an introduction to the functionality and configuration of Nagios here, but anyone who has ever had to work manually with the configuration files will confirm that this initially confusing tool simplifies a lot.
I want to add a target on the internet, whose reachability I check in regular intervals using a ping command. As long as I get a response from the target, our Internet connection stands. However, as soon as the target is not reachable, our NEMS gets to know about it. The time and failure of the Internet are logged.
Many use the IP addresses of the Google or Cloudflare DNS servers for this. For this example I use the Google DNS server with the IP address 8.8.4.4.
You can use any destination on the Internet as long as you are sure that the destination server is always reachable, and responds to ping requests.
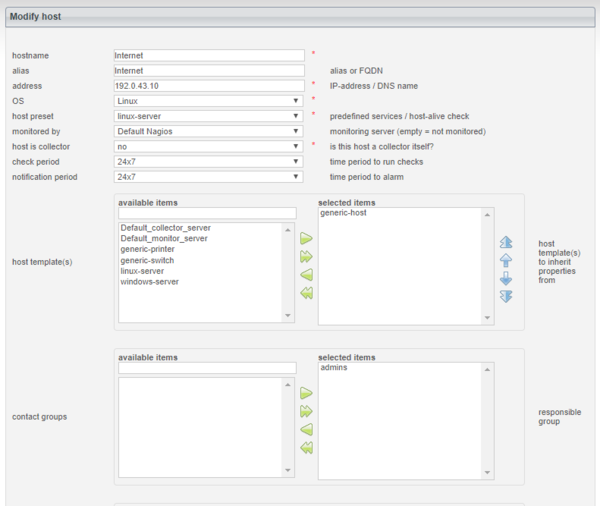
So in NConf we go to "Add" at "Hosts". As hostname and alias we can enter anything we want in our case. I just call it "Internet". As IP address we take the already mentioned address 8.8.4.4.
In the field "monitored by" we have to select "Default Nagios".
For Host Template we choose "generic-host" and move it with the green arrow into the window "selected items". We do the same with the entry "admins" in the area "contact groups". (Please ignore the IP in the screenshot, it should be 8.8.4.4):
Below we specify the values for "max check attempts", "check interval", "relay interval", "first notification delay", "notification interval".
At "notification options" I want to be notified only if the target is "down" or "unreachable", so I enter "d,u".

By clicking on "Submit" we save the installations.
On the next page we mark the entry "PING" in the text field "Advanced services (directly linked)" and move it with the upper arrow into the right window. Please do not forget to click on "Save".

Now comes the stumbling block that most users get stuck on: in order for our NEMS to take over the settings, a Nagios configuration file must first be created from the settings made, and this must then be made available.
So we click on "Generate Nagios config". This should go through without any errors due to the few changes made. Afterwards we go to "Deploy".


When the deployment has also gone through with 3 times OK, we can look at our Adagios overview again:

The number of hosts has now increased to 2, and there are currently no faults. When we go to "Hosts" in the menu, both currently monitored hosts are displayed.

Now, with the RaspBerry Pi, we have installed a cost-effective network monitoring solution in a short time.
Now, notification options can be set up as needed, devices and services can be added, and much more.
Nems also offers some nice features "out-of-the-box". For example, it is possible to save the complete configuration of the NEMS system to a file via the browser. If the SD card, or the RaspBerry Pi, fails, it can be restored very quickly and easily.
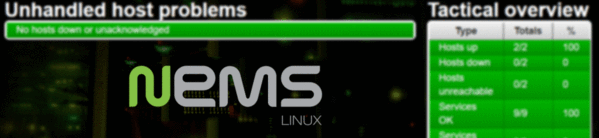
Also nice is the display at http://nems/tv/ which you can call in any web browser to see the current status.

Of course, there are still a lot of options and possibilities, but I hope this post has piqued your interest in the world of network monitoring.
To our contribution "are we online" some expert readers have already given feedback. The alternative proposed solutions are certainly superior to the NEMS system in all areas - however, the installation and setup with NEMS is so elegantly solved that I wanted to present this solution.
Was today's post interesting to you? Feel free to leave a comment, or email us.
I hope we could convince one or the other to get their RaspBerry out of the drawer or box to try out the NEMS system.
With this I say goodbye for today, and wish you all a lot of fun while tinkering.
Your Markus Neumann


8 comments
Andreas Wolter
Hallo Herr Braun, der Beitrag ist etwas älter, daher möchte ich lediglich auf die Webseite von NEMS verweisen. Dort gibt es eine Erklärung, wie man ein Backup durchführen kann:
https://docs.nemslinux.com/en/latest/basic/backupnems.html
Grüße, Andreas Wolter
Walter Braun
Die Anleitung ist ausgezeichnet, auch ein Anfänger wie ich kann den Monitor installieren und konfigurieren. Er läuft jetzt seit ein paar Stunden und zeigt eine stabile Internetverbindung.
Kurz vor dem Ende des Beitrags steht der Satz “Es ist z.B. möglich die komplette Konfiguration des NEMS Systems über den Browser in eine Datei zu sichern.” Das wäre für mich auch interessant, aber als blutiger Anfänger weiss ich nicht, was zu tun ist. Kann mir jemand einen Hinweis geben?
Ben
Hi,
I just install nems on a pi3b+, i’m noob in monitoring nrtwork and your small tuto help me to discover that.
Thanks a lot.
Sincerly
Ben (from France)
Denny
Hi,
vielen Dank für den Guide. Ich habe erfolgreich mit der Anleitung einen Rasp Pi 3b mit der aktuellsten Version von NEMS aufgesetzt. Nun bin ich dabei, die IT unseres Unternehmens damit zu Überwachen. Wir haben 2 physische Server, 10 virtuelle, 13 Clients, 1 Firewall, 4 Switche. Gerne würde ich alle über NEMS im Auge behalten. Jedoch komme ich mit der Konfiguration nicht zurecht. Könnte mir da jemand behilflich sein? denny.lukic@gmail.com wäre meine Mail. Vielen Dank
Udo
Hallo ,
die Erklärung um das einzurichten genial ,mit dem Programm ,muss man sich rein Arbeiten .
Hallo OlegR ,
habe ich Versucht bin aber ohne Erklärung nicht zum Testen gekommen .
Markus sehr gut rüber gebracht ,Dankeschön
Udo
Rozaanywowl
Great post!
OlegR
Viel einfacher geht’s mit Check_MK https://github.com/chrisss404/check-mk-arm
Kann ich nur empfehlen….
Sanofit
Sehr guter Beitrag, sehr ausführlich und Praxis bezogen erklärt. So sollte der Service bei einem Händler aussehen. 1A+++ Vielen Dank Richard Samt.