While the various Raspberry Pi microcomputers are still hard to come by due to supply shortages, the Pico microcontroller crisis seems to be over. Reason enough to continue the blog series from spring with focus on the Pico W, i.e. the variant with WLAN. I will again use MicroPython and the development environment (IDE) Thonny.
In the first partwe had the installation of Thonny, the setup of theRaspberry Pi Pico and the first application programs for using the inputs and outputs.In the second part was about the programming of the known interfaces OneWire, UART and I2C, all of them second pin assignments. And in the third part we had presented an application for the newest and fastest interface SPI or Serial Peripheral Interface aka 4-wire bus. Already in autumn last year Jörn Weise had presented an weather station with the BME280 sensor and the 0.96 inch OLED SSD1306 display. shown.
In this article I want to take advantage of the WLAN interface and provide temperature and relative humidity with the web server in the home network. However, I will use the DHT20 sensor worth the price and the 1.3" OLED with SH1106 driver IC to minimize repetition.
But first the pinout diagram of the Raspberry Pi Pico W and the differences between the Raspberry Pi Pico and the Pico W:

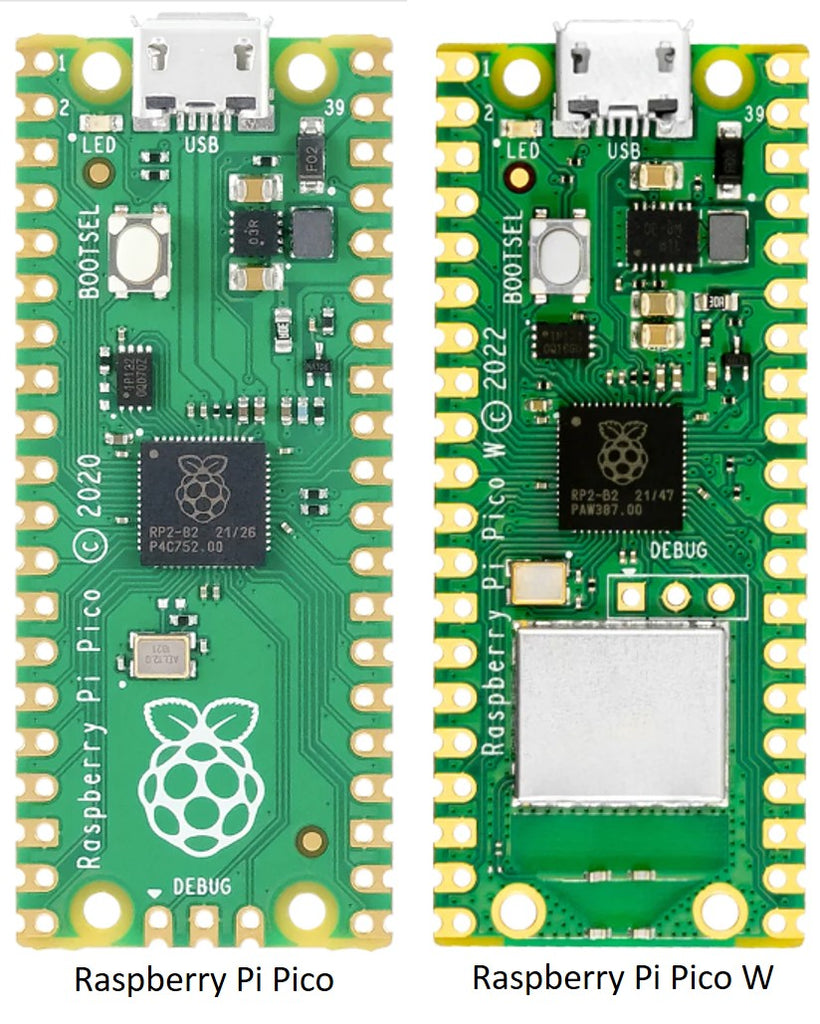
Although the form factor and pinout have remained (largely) the same, the differences in layout are readily apparent. This is most obvious with the WLAN chip and the three mostly free pins for DEBUG, which are now located in the middle of the chip because of the WLAN antenna. The connector for the built-in LED has changed; more about that later. The WLAN interface with 2.4 GHz uses the chip Infineon CYW43439. Bluetooth is not yet implemented; this requires a firmware update, which is not planned in the near future. The latest version of the MicroPython firmware can be found under https://micropython.org/download/rp2-pico-w/.
After downloading the latest file with the extension .uf2 the Pico is plugged into the USB port of a computer with the BOOTSEL key pressed; then it is shown there as USB drive RPI-RP2; see the following picture. Simply copy the downloaded file into the directory. After the copying process is complete, the drive disappears and the Pico W is recognized under Thonny as a virtual COM port.

For those who have not yet installed or updated Thonny, here is the link once again:
Download from https://thonny.org/ or https://github.com/thonny/thonny/releases
Current as of October 2022: thonny-4.0.1.exe


Settings are made under the Run/Execute tab.
As usual, we first test "hello world" in the command line (also called shell or REPL).

The "hello world" in physical computing is the blinking LED, our second attempt:
In the program you can see the difference mentioned above for the built-in LED. With the simple Pico this is controlled via Pin 25 a pin that is not connected to the outside. With the Pico W, the LED is connected to the wireless chip and is addressed via the name "LED".
 import machine
 import utime
 led_onboard = machine.Pin("LED", machine.Pin.OUT)
 while True:
     led_onboard.toggle()
     utime.sleep(1)
After everything worked out, I would like to rebuild Jörn Weise's experimental setup first, to then use both another sensor, as well as another display.
Besides the MicroPython modules machine and utime the modules bme280 and ssd1306 for the 0.96" OLED. Both can be found at PyPI by clicking on "Manage packages ..." under the "Extras" tab and entering the terms in the search window. When selecting, please pay attention to the word "micropython" in the name.


Schematic:

Setup worked, see photo:

Now I first want to replace the 0.96" display with a 1.3" OLED. But this does not have the driver IC SSD1306, but the SH1106; and there is no MicroPython module for this on PyPI. The search on GitHub is quick: https://github.com/robert-hh/SH1106
The module is actually written for the ESP8266, but works fine. So download the ZIP file, unzip it, sh1106.py under Thonny and install it on the Pico W in the directory lib directory. The only deviation for the Pico W in the i2c sample program is an additional parameter during instantiation, the number for the i2c interface:
i2c=I2C(0, sda=sda, scl=scl, freq=400000)
When instantiating the display I had to insert rotate=180:
oled = sh1106.SH1106_I2C(128, 64, i2c, None, 0x3c,rotate=180)
With this it worked right away. So go to the DHT20, instead of the expensive BME280.
I had already used the DHT20 in a blog post in July 2022 introduced. Interesting is the i2c interface, where this combined temperature and humidity sensor differs from the DHT11 and DHT22. There is no MicroPython module on PyPI for this yet either. So again I search on GitHub. I find what I am looking for at https://github.com/flrrth/pico-dht20
Again download ZIP, unzip, dht20.py run it with Thonny and save it on the Pico W in the subdirectory lib subdirectory.
Here are the main new lines in the code:
 from dht20 import DHT20
 dht20 = DHT20(0x38, i2c)           # 0x38 is the i2c address
And in the while loop:
     measurements = dht20.measurements
     tempC = measurements['t']
     humRH = measurements['rh']
Here the whole program for Download.
Now all that is missing is the addition that turns the Pico W into a web server for atmospheric data. Research on the Internet. So far missing. But there are two example programs from the Raspberry Pi Foundation, which have been copied by other bloggers: A simple web server with text display and switching of the LED via the intranet, to be found in the brochure "Connecting-to-the-internet-with-pico-w“.
The part for logging into the home WLAN will always be needed:
 import time
 import network
 ssid = 'Wireless Network
 password = 'The Password
 wlan = network.WLAN(network.STA_IF)
 wlan.active(True)
 wlan.connect(ssid, password)
 # Wait for connect or fail
 max_wait = 10
 while max_wait > 0:
     if wlan.status() < 0 or wlan.status() >= 3:
         break
     max_wait -= 1
     print('waiting for connection...')
     time.sleep(1)
 # Handle connection error
 if wlan.status() != 3:
     raise RuntimeError('network connection failed')
 else:
     print('connected')
     status = wifi.ifconfig()
     print( 'ip = ' + status[0] )
In the lines
 ssid = 'Wireless Network'
 password = 'The Password
please enter the SSID and password for your home network.
As a basis for my project I use the sample program for the text output. Here I basically have to increase the font size of the second line to be able to read the text on the smartphone, as well as insert the measured values as a string. The measured values are updated every 10 seconds based on the HTML line
<meta http-equiv="refresh" content="10">
# Example Code for Web Server and DHT20 sensor
# based on example of Raspberry Pi Pico documentation
# import modules
import network
import socket
import utime
from machine import Pin, I2C
from dht20 import DHT20
import sh1106
ssid = 'Xxxxxx' #Your network name
password = 'Yyyyyyy' #Your WiFi password
#initialize I2C
sda = Pin(12)
scl = Pin(13)
i2c0=I2C(0,sda=sda, scl=scl, freq=400000)
dht20 = DHT20(0x38, i2c0)
WIDTH = 128
HIGHT = 64
oled = sh1106.SH1106_I2C(128, 64, i2c0, None, 0x3c,rotate=180)
#Connect to WLAN
wlan = network.WLAN(network.STA_IF)
wlan.active(True)
wlan.connect(ssid, password)
# Wait for connect or fail
max_wait = 10
while max_wait > 0:
if wlan.status() < 0 or wlan.status() >= 3:
break
max_wait -= 1
print('waiting for connection...')
utime.sleep(1)
# handle connection error
if wifi.status() != 3:
raise RuntimeError('network connection failed')
else:
print('connected')
status = wlan.ifconfig()
print( 'ip = ' + status[0] )
# Open socket
addr = socket.getaddrinfo('0.0.0.0', 80)[0][-1]
connection = socket.socket()
connection.bind(addr)
connection.listen(1)
def webpage(output):
#template HTML
html = f"""
Pico W
{output}
"""
return str(html)
try:
while True:
measurements = dht20.measurements
t = round(measurements['t'],1)
rh = int(measurements['rh'])
temp = "Temperature: " + str(t) + "*C"
humid = "Rel.Humidity: " + str(rh) +"%"
print(temp)
print(humid)
output = temp + humid
#Write data to display
oled.fill(0)
oled.text("Pico W, DHT20 ",6,10)
oled.text("Temp:" + str(t) + "*C",6,26)
oled.text("Rel.Humid:" + str(rh) + "%",6,42)
oled.show()
client = connection.accept()[0]
request = client.recv(1024)
request = str(request)
html = webpage(output)
client.send(html)
client.close()
except KeyboardInterrupt:
machine.reset()
Finally I created the program under the name main.py on the Pico W. With this, the program starts by itself when the Pico W is powered. Thus, the monitoring of the garden shed, or storage rooms is easily possible.

Conclusion: For less than two euros extra compared to the Pico without WLAN, you get a versatile microcontroller with the Pico W, which can be easily registered in the home WLAN and is therefore suitable for many own smart home projects. I myself will soon use it for my favorite project Robot Car. I do not expect any difficulties; I will report back.


2 comments
Andreas Wolter
@Philipp: das Display ist immer an. Wenn Sie das ändern möchten, müssten Sie die Schaltung verändern. Das wäre dann ein separater Teil im Code, der mit dem Taster die Stromversorgung zum Display steuert. Wenn das Display an bleiben und nur die Ausgabe gelöscht werden soll, müssten Sie in der Hauptschleife while nach der Zeile #Write data to display eine if-Anweisung einfügen, mit der Sie den Taster abfragen. Wurde er gedrückt, wird der Code für die Displayanzeige ausgeführt. Zusätzlich müsste dann als zweite Bedingung eine Stopuhr mitlaufen, so dass nach Ablauf der Zeit die Bedingung zur Anzeige nicht mehr erfüllt ist. Sowas wie
if (taster == TRUE and timer NOT > 10000)
nach Ablauf der Zeit müsste die Tastervariable wieder auf FALSE gesetzt werden und der Timer auf 0.
Grüße,
Andreas Wolter
AZ-Delivery Blog
Philipp
Hallo,
Wie kann ich in dieses Projektbeine Funktion einfügen die das display nur auf Tastendruck für 10 sec einschaltet…
Mfg Philipp