These components are required:
- 1x D1 mini V3
- 1x Mini MP3 Player
- 1x PIR sensor HC-SR501
- 1x Mini loudspeaker
Also as Bundle available:
Halloween Spider - The creepy DIY spider with sound and light effects
The idea of the Halloween Spider
Once again, Halloween is just around the corner and offers the dedicated electronics engineer the opportunity for a few relaxed games with spooky things.
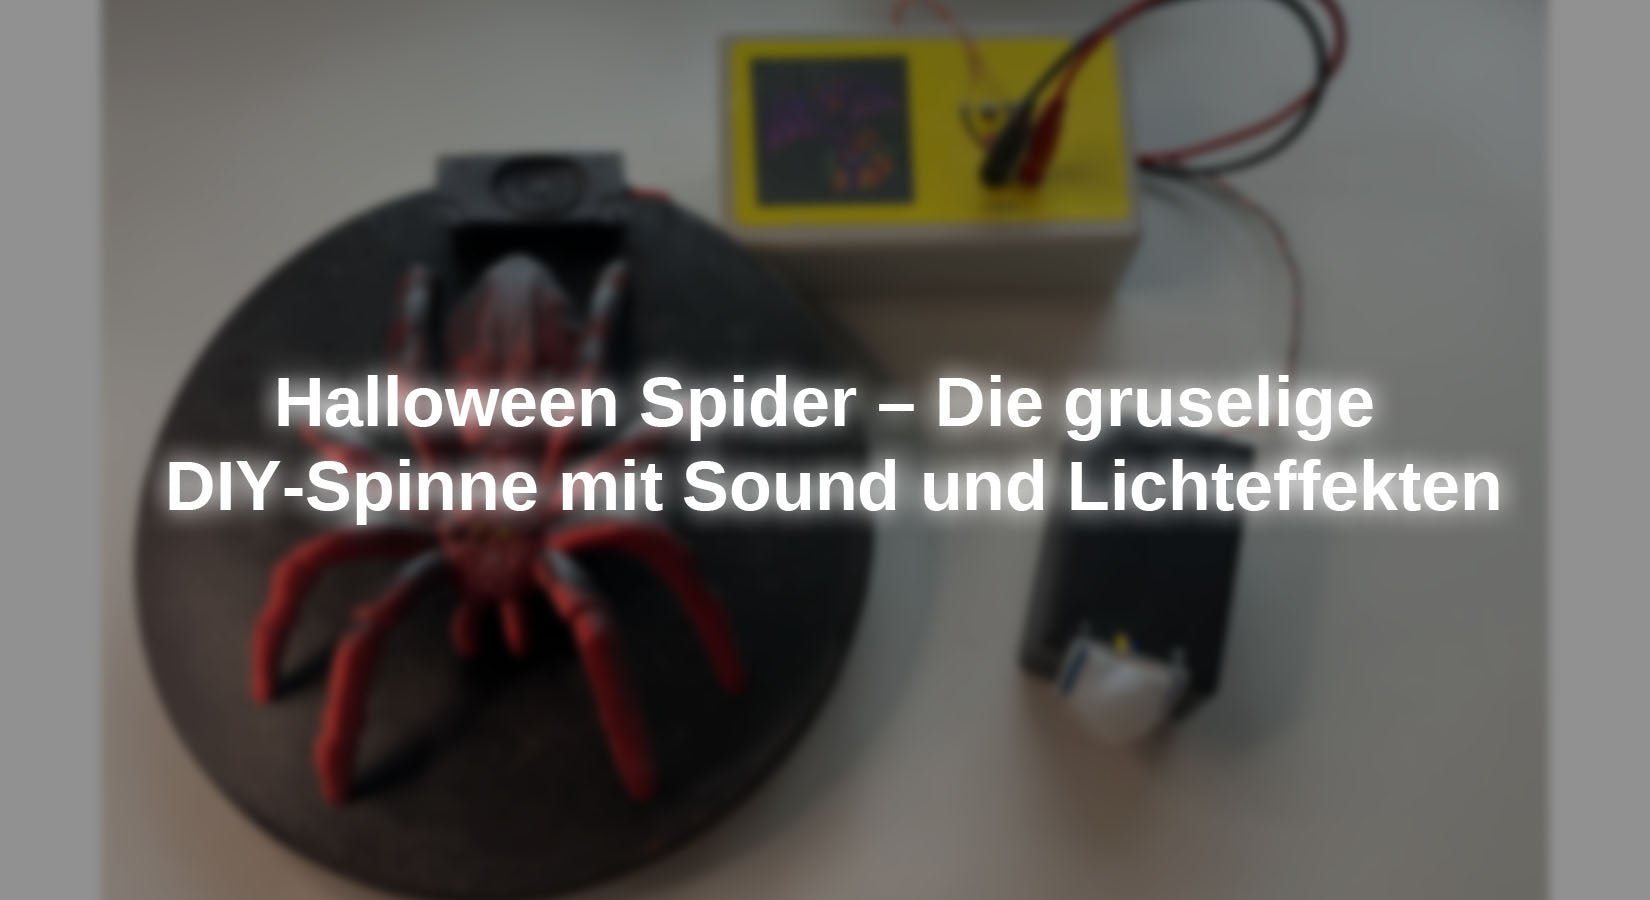
Our project is based on a 3D-printed spider approx. 18 cm long. The spider can be mounted on a black plate, for example:

Alternatively, it is recommended to set it up in a spider's web. This works quite well in that only the five thin wires from the spider's four eye LEDs need to be hidden in the spider's web. The electronics are outside.
The photo shows the spider with its eyes, red and yellow 3mm LEDs. On the right side are the electronics and behind the spider the loudspeaker, which makes a lot of noise. Just right for our application.
As soon as someone enters the room, the PIR sensor on the electronics box detects the intruder. The eyes begin to flicker viciously and monster screams, diabolical laughter and the sound of lightning and thunder can be heard.
If you enter a darkened room and are not prepared for it - quite impressive.
The structure
We want a rather simple project without any particular difficulties. I think you can see how it was realized pretty much at first glance on the Fritzing board:

The microcontroller is the Wemos D1 mini V3, which is not only quite compact, but also easy to handle. It drives four LEDs at 3.3V, which are connected to D1...D4 via 100 Ω series resistors. The return line to ground runs via a switch to avoid problems during flashing and booting. More information on this later for our blog readers who have not yet had anything to do with it.
The PIR sensor is operated with 5V and also needs this voltage. As its output only jumps back and forth between 0 V and 3.3 V (3.3V = HIGH >> means "object detected"), we connect it directly to the microcontroller without a level converter.
The Mini MP3 Player is also an "old acquaintance". This time it is used to play a single sound file that contains our "monster soundtrack".
The Mini MP3 Player offers us the simple option of controlling "Segment1" directly via the ADKEY_1 connection. To do this, this connection is briefly pulled to LOW (= 0 volts). And the monster starts raging with a devilish noise. There is no need for a volume control. And all this with an operating voltage of 3.3 V.
Incidentally, I supply my "monster" with 5V from the "battery vampire", a circuit that you will soon also get to know in the blog. The "vampire" really fits perfectly here!
Spider from the 3D printer
Not all of us have a 3D printer. If you have one, you can use the attached stl file directly. Please check whether the file can be executed on your printer.

If you don't have your own printer or a friend who can do the printing, you can use one of the 3D printing services on the web. As a rule, you will be quoted a fixed price after uploading the stl file.
The print template provides for 3mm LEDs in the four eye openings.
Soundtrack
I also provide a soundtrack. It consists of several files, which I have combined into an mp3 file using Audacity. The sounds are license-free for your private use.
Of course, you are welcome to find your own sounds or create them yourself.
As soon as your mp3 file is ready, load this file onto a FAT-16 formatted SD card. That's all you need. There must only be this one file on the card. It represents "Segment1".
The sketch
Even if the sketch is compact and clear, a few comments on it.
In void setup() the I/O pins are configured according to the fritzing display. The serial interface is only used for possible debugging. There is only a single message as soon as an object is detected.
In the void loop() the sketch waits until the PIR sensor detects an object. Then flashing_eyes and makes the eyes flash. Here you have many possibilities to vary the sketch, to make the eyes flash even longer or more often, just as you like.
At the same time, the processor of the Mini MP3 Player with a start command digitalWrite(14, LOW); is triggered. The pulse lasts approx. 100ms and simulates a manual button press. This is exactly the function of ADKEY_1 that we are "simulating" here with the D1 mini.
Now the noise starts. While the player is running, you can flash your eyes again or trigger other processes. The Mini MP3 Player runs completely through the soundtrack, regardless of what else happens in the sketch. It has its own CPU.
With the instruction delay(10000); I prevent the sketch from triggering the soundtrack again and again if another object is recognized while the soundtrack is running.
Special features when flashing and booting the D1 mini V3
Occasionally I encounter slightly frustrated readers of the AZ blog that fail to flash the D1 mini. One of the pins D3, D4 or D8 is almost always connected. In our case, D3 and D4 are loaded with 100 Ω and an LED as far as the specification allows, namely with 10mA. Flashing is therefore guaranteed to go wrong.
A simple solution is to either not use these pins as outputs at all or to use them in the flashing and booting (starting the CPU). For this reason, I have provided a small switch. I first connect the circuit to + 5V and then flip this switch.
The CPU starts with a RESET as soon as the operating voltage is applied. I can then load the ports without any problems. I only need one switch because it switches the four LEDs at their common cathode.
If they ever come across a CPU that won't flash or start, they take the CPU out of the circuit and see what happens without the circuit. 95% of the time: It doesn't cause any more problems. That's why I only ever work with socketed CPUs.
Another question I often hear: What is the best board manager for the D1 mini V3?
I have had the best experiences (within the Arduino IDE) with LOLIN Wemos D1 R2 & mini.
Now I wish you a lot of fun and success in rebuilding the Halloween Spider!
Yours
Michael Klein
Additional information:


8 comments
Reimund
Bekomme es nicht auf den Wemos
O:\Halloween_spider (1)\Halloween_spider (1).ino: In function ‘void loop()’:
O:\Halloween_spider (1)\Halloween_spider (1).ino:25:5: error: ‘flashing_eyes’ was not declared in this scope
25 | flashing_eyes();
| ^~~~~~~~~~~~~
exit status 1
Compilation error: ‘flashing_eyes’ was not declared in this scope
Reimund
wo kann ich den kompletten Sketch finden ?
Johann Brandauer
Hallo Rainer
Ich hätte gerne den kompletten Code für das nette Projekt
Besten Dank
Norbert
Hallo Herr Klein,
ich zitiere Sie; “laden sie diese Datei auf eine FAT-16 formatierte SD-Karte”
Ist das tatsächlich notwendig? Unter Win11 kann ich doch nicht für FAT16 formatieren. Oder sehe ich das falsch?
Bei mir kommt (mp3 auf FAT32 formatierter Karte) immer nur ein kurzer und sehr leiser Knacks aus dem Lautsprecher. Die LED auf dem Player blitzt auch nur ganz kurz auf.
Michael Klein
Hallo Herr Ziegler,
dass der DFPlayer nur mit 5 V einwandfrei läuft, scheint von Varianten des verbauten Steuerchips ab zu hängen. Das Problem hatte ich auch beim sprechenden Multimeter (siehe Blogreihe dort). Bei mir habe ich beide Varianten, allerdings setze für die Spinne auch auf 5V, da der Prozessor ja nur einen Digitaleingang mit “1” und “0” bedienen muss, also kein Risiko einer Überspannung besteht.
Viel Spaß beim Gruseln … Süsses oder Saures?
Grüße
Michael Klein
Reiner Ziegler
Funktioniert bei mir nur, wenn der MP3 Player mit 5V versorgt wird …
Reiner Ziegler
Tolle Idee … die Spinne ist schon gedruckt mit 50% Größe, reicht auch … allerdings kommt beim Sound nur geknatter … Aufbau zum Test, nur Wemos und MP3 Player + LEDs …
Irgendeine Idee? Habe auch schon zwei verschiedene SD Karten und MP3 Player versucht.
Reiner Ziegler
Tolle Idee … die Spinne ist schon gedruckt mit 50% Größe, reicht auch … allerdings kommt beim Sound nur geknatter … Aufbau zum Test, nur Wemos und MP3 Player + LEDs …
Irgendeine Idee?